photo credit The Survival Woman
I mentioned in the comments section of the What Would You Do: North Korea Attacks that I would put together some options for those of you without basements. I started working on one and soon realized that to do the topic justice I needed more time. Instead, I am going to post the article I had planned to post today and will post an article on the topic of radiation and fallout next week.
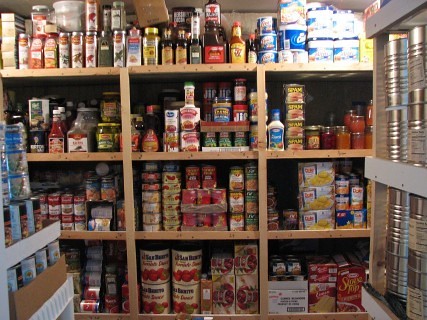
The Ins and Outs of Food Storage
It’s been a while since I have covered food storage. Because of that and a couple good forum threads, I thought I would bring the subject up again. One of the five basic human needs is food. It can be one of the more difficult to figure out when you’re new to preparedness. I think the reason for that is because the sheer size of the problem can be overwhelming. Take a family of four, eating three meals a day, and two snacks a day, that is 84 meals and 56 snacks in a week, or 336 meals and 224 snacks in a month. Seeing as most people shop for what their needs will be in the next week or two, planning that far or further ahead can be a lot to wrap your brain around.
Guidelines
Food storage isn’t one size fits all. You’ll need to tweak things to fit your family’s needs. That being said, here are some guidelines that can help you build your food storage and keep it rotated.
Shelf Stable
My definition of a shelf stable food is one that can last for six months or longer without freezing or refrigeration and won’t spoil.
Eat What You Store, Store What You Eat
This is the food storage golden rule. It will make sure that you don’t waste money on foods your family doesn’t eat.
When building your pantry, I recommend getting a notebook and writing down all shelf stable food that your family consumes for a week or two. These are the “eat what you store, store what you eat” foods to concentrate on.
There are exceptions to every rule and this one is no different. We happen to eat foods that don’t store well, so if we only stored foods that were shelf stable that we consumed regularly, our food storage wouldn’t last for very long. What we have done is stored some shelf stable foods that we eat occasionally along with some that, because of their long shelf life, we have decided to leave as storage foods.
First In, First Out (FIFO)
When you grab a can of vegetables take it from the front of the line. When you replace it, put it in the back of the line. This is the best way to rotate your foods.
What Kinds of Foods Should You Store?
If you’re like me, what can you do to supplement your food stores with foods other than the ones you eat frequently? There are many options available for foods that have a long shelf life, though some you will need to repackage.
Staples
A staple is a food that is used commonly. Think of sugar, flour, salt, rice, beans and so on. These staples, when repacked into Mylar bags with oxygen absorbers, can have a shelf life of 25+ years.
Dehydrated
There are commercially dehydrated foods sold that tout a 25+ year shelf life. This can be achieved because the oxygen in packaging is replaced with nitrogen. Most of the data I have seen on home dehydrated foods say 1-2 years. We’ve mostly dehydrated fruits, but you can make jerky, soup ingredients and so much more. Sadly the dehydrated foods never seem to last more than a couple weeks around me, so I’ll never get to see if they could be edible after a few years. J
Freeze Dried
There are many brands of freeze dried foods on the market. I have tried a few and enjoyed most. Trudee and the kids did not like some. Some manufacturers have gotten smart and have the entrees available in a pouch and a #10 can. I highly recommend you try the pouch, as it’s only a few bucks and will save you money if it turns out no one likes it.
Freeze dried foods also have a shelf life of 25+years, as long as the packaging isn’t opened. Once you open the #10 can, you need to consume it within two weeks. I don’t know if it is possible to freeze dry your own food.
Because of the shelf life, and some other factors, we decided to add some freeze dried food to our food stores. We purchased some entrée’s as well as some baking ingredients like powdered egg, powdered milk, powdered cheese and powdered sour cream.
MRE’s and Emergency Ration Bars
MRE’s or Meals Ready to Eat are already cooked meals. They include a heating element that you add water to in order to activate. They often come with a desert and some condiments. Emergency Ration Bars often say something like “2400 calories”. That is for the total bar. However, there are usually nine separate bars, each one containing 250+ calories.
These foods have their place in food storage. They make good additions to BOB’s and car kits. Shelf life can vary from 5-8 years if stored in optimal conditions.
Home and Manufacturer Canned Foods
Whether you purchase commercially canned food or can it yourself, canned food is a great way to supplement your food storage. The most common question is: “how long does canned food last?” Food Reference.com and the FAQ at the Ball Jar Company state the same basic information. Properly canned food that is stored in temperatures above freezing and below 75 degrees will last at least two years. The food will often last a lot longer than that, but over time there may be changes in the color, texture etc. If the home-canned food looks edible from the outside, open it and see how it smells. If it is store purchased and not bulging, open it and see how it smells. If it smells fine it’s probably safe to eat.
What are the Dangers to Food Storage?
The life of many foods can be extended greatly by avoiding the following dangers.
Heat
Temperatures between 40 degrees and 72 degree Fahrenheit are ideal for food storage. For every 18 degrees above 72, the food loses up to half its nutritional value. If the food is exposed to temperatures over 72 degrees for an extended amount of time it can lose its color, texture and taste.
Light
Keep things in a dark space if at all possible, light can affect the appearance and taste of food. Mylar bags and food grade buckets will also help here.
Oxygen
When fats oxidize they turn rancid. Keeping your food in an oxygen free environment will prevent this, as well as kill pests that may be in the food. You can remove oxygen with oxygen absorbers in an airtight bag. I’ll cover deciding how many to use below.
Moisture
Moisture can take the form of humidity, condensation or even a water pipe breaking. To mitigate this, I keep much of my preps in Mylar bags and put the Mylar bags in food grade buckets. You can also add a desiccant to the inside of the Mylar for added moisture removal. I try not to have any food with cardboard packaging out in the open, as it is susceptible to accidents involving liquids, such as broken pickle jars, broken pipes or the “Not Me Ghost”, you know, children.
Pests
Pests range from larvae in bulk food to mice in your food storage area. There are a few ways to deal with each. For larvae, you can place a bag of rice, beans or whatever dry food you intend to store in your freezer for a couple days. This will kill any bugs, larvae or eggs. I used to do that, but it’s time consuming, my freezer isn’t that big and it’s usually full. I found, on a forum, that the simple act of removing the oxygen would kill any pests in the food. This made sense and they were steps we were already taking. We have not had any problem with pests in any of the food we have stored this way. If you want to make sure, feel free to do both. I have also read that Bay Leaves will keep pests away and some people add them to the inside of the Mylar bag as well as the inside of the food grade bucket.
To summarize, keep your food storage in a dry, dark, cool area in oxygen free and pest resistant containers.
How Much Food Should I Store?
This is something everyone will have to decide on their own. That being said, I think everyone should have a minimum of three months food stored. I personally would eventually like to get to one year stored for my family. This will give us a large cushion if I should lose my job, or a number of other things take place. It would also give us room to help those in need in a short term situation.
When you’re beginning your food storage it may be difficult to wrap your mind around storing an extra 90 days of food, or an extra year. Don’t overwhelm yourself! Break it down into easier chunks, like a week, then two and just keep adding to it.
How Do I Know How Much Food I Have Stored?
There are a couple ways to approach knowing how many days’ worth of food you have stored. The first is to determine the required caloric intake for your family, then count up the calories of all the food you have stored, divide calories needed into calories stored and you now know how many days of food you have put up.
The second way is to use a food storage calculator. Emergency Essentials has a very good one that is free. With it, you can add how many family members you have and some basic information about them. There are over 500 foods already populated to choose from and the ability to enter your own foods that might not be populated. Once you’ve entered in all of your food storage, simply hit “calculate” and it gives a tally of how many days food you have stored, along with the nutritional information. If you shop from Emergency Essentials, you also have the ability to add items that you want to purchase on your next order.
How Can I Afford Food Storage?
I recently wrote an article called “Frugal Preparedness”. It has many tips and the comments have even more suggestions from readers. There are many easy things you can do to build your pantry.
If you just need to bring in more money, one option, if you qualify, is donating plasma. I checked into it a couple years ago and you can do it twice a week, receiving $25 each time. That’s an extra $200 a month! Blood Banker is just one online resource. It may or may not list locations that buy plasma near you.
If you liked this article please think about sharing it on the social media listed below, thanks!


