December 21, 2024

Shelf Life of Comfort Foods

Shelf Life of Comfort Foods

We’ve all got foods that can help lift our spirits or give us comfort when we’re having a bad day. So to me it just makes sense to have some of them stocked for a time when things have taken a turn for the worse. I realize that different people will find comfort in different kinds of food, so I tried to think of as many types of foods that could be considered “comfort foods” (and drinks) that have a decent shelf life.

Because manufacturers use “best by”, “sell by” and expiration dates to generate more business, grocery items do not actually go bad when they reach their expiration dates. Companies don’t cater to prepper’s who buy for long term storage. They have not put any money into figuring out how long their product can be stored. Because of this, the guidelines below are just that and should be looked at as a general rule of thumb and not something hard and fast.

How and where items are stored play a very large part in how long they will remain good. Keep in mind the enemies of food storage; air, moisture, pests, light and heat. Food should be kept at or below 70 degrees. Warmer temps will degrade food quicker. Keep food in a dry place. If you store food in an area with water pipes, I suggest keeping food in paper or cardboard in plastic totes. Keep food out of sunlight. One other enemy of food storage, which is more of a danger to comfort foods; a sweet tooth. To keep the “Not Me Ghost” out of your stock of comfort foods, you could label them as something less enticing.

Many of these products are sold in paper or cardboard materials, which are not air tight and not ideal for long term storage. You would most likely be able to extend the shelf life if you repackage them in Mylar bags with oxygen absorbers.
 
 
Beverages

Dry Drink Mixes         Two years
These would be items such as Kool Aid, Gatorade, Lemon Aid, Tang, hot cocoa and so on.

Alcohol         Many years to indefinite
In the apocalypse, one might really need a stiff drink at the end of the day. Alcohol lasts for a very long time. If left unopened, in a cool dark place, it could have an indefinite shelf life.

Tea         Two Years
Loose tea, instant or tea bags, tea will remain fresh for roughly two years. It would be safe to drink after that, but might not taste as good.

Coffee         It really depends
I’m only going to cover unopened coffee.

Ground Coffee         3-6 months past expiration date in the pantry, 1-2 years in the freezer.
Whole Coffee Beans         6-9 months past expiration date, 2-3 years in the freezer.
Instant Coffee         I have seen from 2-20 years given in the pantry and indefinite in the freezer
Green Coffee Beans These are not yet roasted, and since the bean hasn’t been cracked the shelf life is extended. Camping Survival carries green coffee beans stored in a #10 and claims that because they are devoid of oxygen, that they have a 20 year shelf life.

Pop/soda         It depends
Regular pop/soda will last for a very long time. Diet pop/soda goes bad not long after the expiration date.
 
 
Food

Baked Goods         It Depends
Many comfort foods are baked, so here are some common baking ingredients. Many of these can attract bugs. I recommend you store them in Mylar bags with oxygen absorbers. This will keep them safe from all of the food storage enemies.

Whole Wheat Flour         Varies
Flour won’t keep long unless in the fridge or freezer. Shelf life in the fridge is 6-8 months and 1-2 years in the freezer.

All-Purpose Flour         Varies
All-purpose flour can be stored for 6-8 months in the pantry, 1 year in the fridge and 1-2 years in the freezer.

Wheat Berries         Very Long
Wheat berries are ground into flour. Because the husk has not been cracked, the storage life is greatly lengthened when stored in Mylar with oxygen absorbers.

Powdered Egg         5-10+
Powdered egg is often freeze dried and, like many freeze dried foods, the shelf life is very increased.

Powdered Milk         Depends
Powdered Milk will last a week or so once opened. If left sealed in the pantry 5-10 years is possible.

Cornstarch         Indefinite

Baking Soda         Indefinite

Sugar         Indefinite

Baking Powder         6-18 months
It is suggested to use it within 6-12 months after purchase. However, it may store for 18 months in a cool dry area.

Coco         1-2 years
Opened coco will last for a year or so, unopened 2 years.
 
 
Other types of foods

Nuts         1 Month to 2 years
The oil in nuts is what causes them to go rancid. Most nuts will be good for 2-9 months after the expiration date when stored in the pantry, 1 year if stored in the fridge and 2 years in the freezer.

Candy         It really depends
There are many types candy, so there is no set answer. If it contains nuts, it obviously has a shorter lifespan. If it is a gummy type of candy, it will probably harden, but should be safe for years. Hard candy has the longest shelf life. M&M’s will last 1-1.5 years due to the candy coating.

Chocolate         Months to years
Items that contain just chocolate, like chocolate chips, Hershey’s Kisses and candy bars only containing chocolate have a varying shelf life. The lighter the chocolate, the shorter that is. I found the following on the Hershey’s Product FAQ

Q. How should I store chocolate?

A. Solid chocolate products will maintain their quality if well wrapped and stored in a cool, dry place (55-60°F). While refrigerated chocolate is certainly safe to use, we don’t recommend it. Chocolate kept in the refrigerator may “sweat” when brought to room temperature and may not melt properly. Cocoa is considered a non-perishable item which should maintain quality if stored at room temperature in a tightly sealed container.

Chocolate may turn white. This is called “blooming”. The chocolate is still perfectly edible. Here is what Hershey’s has to say in the FAQ.

Q. My chocolate sometimes turns tan or white. What causes this?

A. Chocolate contains cocoa butter, a vegetable fat that is sensitive to heat and humidity. Temperatures above 75°F will cause chocolate to melt. The cocoa butter can rise to the surface and form a discoloration called “cocoa butter bloom.” Condensation on milk or semi-sweet chocolate may cause the sugar to dissolve and rise to the surface as “sugar bloom.” Chocolate that has “bloomed” is certainly safe to use, but flavor loss and texture changes may be noticed.

Powdered Jell-O         Nearly indefinite (Maybe)
Most of the info I could find is from sites that are not taking into consideration storing long term. But I believe as long as you’re storing the varieties that have sugar instead of artificial sweeteners, these should store for a very long time.

Powdered Pudding         Nearly indefinite (Maybe)
Most of the info I could find is from sites that are not considering storing long term. But I believe, as long as you’re storing the varieties that have sugar instead of artificial sweeteners, these should store for a very long time.

Honey         Indefinite
Honey can harden, but will turn to liquid when heated, and will last forever.

Various Syrups         Indefinitely
Maple Syrup and molasses can last a very, very long time and often do not require refrigeration.

Jams, Jelly         Depends
If they contain natural sugar, they will last a very long time. Just throw them if you see mold develop. If they have imitation sugars they need to be refrigerated. It’s probably not safe to consume them long after the expiration date, or if left unrefrigerated for an extended time.

Peanut Butter         Depends
Many sources I found say that because of the oil in the peanuts, peanut butter is only good for 2-3 months if opened, and 6 months past the expiration date if unopened. However, when the oils go rancid they taste bad, so if it looks ok, and tastes ok, it very well could be safe to eat. The nutritional value of it, of course, is going to degrade over time.

Nutella         Depends
The sources I have found say 3-4 weeks past the expiration. This is purely my speculating, but because Nutella also has nuts in it, it should be in the same boat as peanut butter. I, however, do not know if peanuts and hazelnuts have the same shelf life.

Dried Fruit         Depends
Dehydrated or otherwise dried fruit have a shelf life of roughly 6-12 months in the pantry, 1-2 years in the fridge and indefinitely in the freezer.

Freeze Dried Deserts         Very long time
Many freeze dried foods boast of a 20+ year shelf life. These often fall into the same time frame.

Dry Soup Mixes         Hard to Say
I have seen some sites claim 1-2 years past the expiration dates. Others say they’ll last almost indefinitely. My guess would be at least five years or so.

Pancake Mix         Depends
Pancake mix contains flour, so go by the same timespan as flour.

Soup Mixes         Depends
This is another area where the companies want you to eat the soup, not store it for a rainy day. The times they give are a year or two. However, the ingredients are often either dehydrated or freeze dried and they are stored in air tight containers. My guess would be that they would store for many years.

Jiffy Mixes         years
Jiffy says “For best results, we recommend using all “JIFFY” mixes by the “Best If Used by” date. Beyond this date, dependent upon local weather and storage conditions, the quality of the end product may be affected.” I would think, if kept in optimal conditions, they will store for 1-2 years. Many of them will contain flour, so go by the same timespan as flour.

Popcorn         Depends
Microwave popcorn or popcorn that has been flavored is probably as advertised. Popcorn that is just popcorn seed, like wheat, because the hull hasn’t been broken, will store indefinitely. It can be popped, or ground and used as cornmeal. Once ground into cornmeal, the shelf life is greatly decreased.

If you have an item that you would like to add, a correction or a comment, please post it in the comments section.
Please click here to vote for Prepared Christian as a top Prepper site!

 
Please click here to vote for Prepared Christian as a top Prepper site!

If you liked this article please think about sharing it on the social media listed below, thanks!

Preparedness Club

The Seed of the Month Club

Seed of the Month Club

Now is the time of year to start thinking about the spring garden. Part of that process is ordering seeds. You may have noticed that one of my supporters is the Seed of the Month Club. I only accept advertisers that I think are high quality and can really benefit you, my readers. The Seed of the Month Club is among them!

Because it’s approaching the garden season, I thought I would tell you a little about the Seed of the Month Club, so you have some time to take advantage of it before you start your seeds.

I asked Mike the Gardener a few questions about the Seed of the Month Club and about gardening in general. Those questions and answers are below.
 

Chris: More and more people are taking up gardening for the first time. I can attest that there is a learning curve in gardening, so for beginners what is a good fruit or vegetable that is hard to screw up?

Mike: I always tell everyone, the first rule of thumb is to grow what you like to eat. It makes no sense in growing something that no one in your family will consume. When you grow something you are likely to eat, the chances of you taking care of it and seeing it through are far greater. With that said, there are a number of vegetables that I would consider very easy to grow, but the top of my list would be tomatoes.
You can grow just one plant and get plenty of fruit from them especially if you grow cherry or grape types.
 

Chris: How should seeds be stored?

Mike: To keep seeds for longer term storage, you want to make sure they are kept in a cool, not cold, dry location. This past gardening season I just germinated some onion seeds that were about 8 years old.

When they are stored correctly, you can get great germination rates from your seeds.
 

Chris: What is a good method to tell if you need to water?

Mike: What I would recommend to all gardeners is to keep track of the amount of water given to plants. I find that less water is better than a lot of water. You will want to keep track of the amount of rain you receive so that you know for sure your plants need water. Most vegetables can get away with just an inch or two of water per week.

However, let’s say you do not have a rain gauge, you can always refer back to the old “dirt” test. Plunge your finger into the soil about an inch or two and if the soil is dry and crumbly, chances are your plants need some water.
 

Chris: Can you list a few things that someone with limited space could grow?

Mike: This is a great question. It’s also open to a lot of possibilities as what or who defines “limited” space. Keeping in mind the answer to question number, my recommendation would be to grow prolific producers that can also be grown vertically. While you may be limited horizontally, when it comes to gardening, the sky really is the limit. I would recommend indeterminate tomatoes, again, cherry, grape as well as various other heirloom varieties, pole beans, indeterminate cucumbers such as Ashleys or Straight 8s. Peas are another good choice as well. My favorite are sugar snaps.

If someone is new to gardening I offer up 3 tips that are very useful to make sure new gardeners do not get frustrated. One, grow what you like eat. I touched on this earlier. Two, keep your garden small.
Gardening is work and the larger garden you have, the more work it can be. So if you are new to gardening, start small with just a few plants and grow each season from there. Three, keep your garden in sight.

Preferably right outside a window of your home in a room that you and your family frequent the most. I have found that people who are not constantly looking at their garden, tend to forget about it.
 

Chris: How many seeds can members expect to get per month? (A reader had this question months ago, so I asked Mike.)

Mike:
It varies based on seed variety, for example, squash seeds are larger so you can expect about 20 to 50 depending on which variety of squash … whereas tomato seeds are small so you can expect around 300 to 500 seeds in a packet.
 

Here is some info taken from the Seed of the Month FAQ.

How much is a membership?

In the United States
Six months $4.11
One Year $3.70
Two Years $3.33

International
Six months $5.11
One Year $4.60
Two Years $4.14

Your Membership Includes

• Open pollinated, heirloom varieties
• 8 packs of seeds your 1st month
• 4 packs of seeds every month thereafter
• 30 day money back guarantee
• 25% off vegetable gardening products in our online store
• Free shipping

When can I expect to receive my first mailing of seeds?

Your first shipment is sent out within 48 hours of you ordering. We ship via the United States Postal Service. The length of delivery time will be based on your location. You can expect your first shipment to arrive within 7 to 10 business days from the date you place your order.

When can I expect my monthly seeds to arrive?

Your first 8 packs of seeds are mailed right away. Then each month you will receive 4 packs of seeds by the last Friday of each month for the month in which they are due.

25% Discount

Just in case you missed it, Mike gives members a 25% discount on the Average Person Gardening Online Store. That is a 25% on vegetable, fruit and herb seeds, seed starting supplies and on soil testers. This would be a great way to save on seeds that you know you want to grow for sure this season.


My Take

I like that Mike only works with companies that give non-GMO, open pollenated, heirloom seeds. This way you can collect the seeds at the end of the season if you so choose.

As I stated in one of the questions to Mike, there is a learning curve to gardening. I think it is a skill every Prepper should practice, even if it’s only in a pot you place in the window. I agree with Mike, going vertical is a great way to mitigate limited space. Here is a trellis I made of PVC,. A version of this could be made for a large container.

If you haven’t ever looked at an heirloom seed catalog, you would be amazed at how many varieties of vegetables there are! I think this is a great way to get some seeds for a variety of vegetables you might not have known about previously.

I also think this would be a great way to build your own “Survival Seed Bank”. It’s cheaper than some of the commercial ones I have seen.

 
Please click here to vote for Prepared Christian as a top Prepper site!

If you liked this article please think about sharing it on the social media listed below, thanks!

PreparednessClubOne

31 Gallon Garbage Cans for Food Storage

31 Gallon Garbage Cans for Food Storage

Years ago, while building our food storage, we bought a bunch of 3-gallon, food-grade buckets from a bakery. We used 1 gallon Mylar bags for all of our LTS (Long Term Storage) and found that we could fit 3-4 1-gallon bags in each bucket. When we decided we wanted to add to our food storage, we discovered that the bakery we had previously purchased buckets from had gone out of business. I had previously tried stopping at other bakeries to get buckets and had only gotten a few over the course of a week.

I decided to try and find another solution. I came up with 31 gallon garbage cans. Below I have some factors that I considered and my thoughts on each.
 
 
Food Security

When I started prepping and researching food storage, a lot of the information I found made it seem like you had to put the food in Mylar bags and the Mylar bags in food grade buckets. The truth is that you only need food grade buckets if you’re storing your food directly in the bucket, without the Mylar bag. Unless you’re using the food stored directly in the bucket frequently, I recommend putting it in 1 gallon Mylar bags. This way you will only have a small amount of food to use at one time and the food in the other bags isn’t exposed to oxygen and the moisture in the air.

If you’re using Mylar, it is food grade, so you can put the Mylar filled bags in any container that is dry and won’t puncture the bag.

I have read many stories of mice and other rodents chewing through plastic buckets to get to the contents. This just isn’t going to be a problem with a metal can.
 
 
Cost

Home Depot has a 31 gallon steel trash can listed for $24.97. I bought mine at a local Menard’s for a similar price.

I have looked at a few different places who sell food grade buckets online and they are not all of the same quality. I have purchased from Bay Tec in the past, so I am going to use their prices, as I trust the quality and the price is somewhere in the middle. They have a six pack of 5 gallon buckets for $27.54 and a 3 pack of buckets for $14.07. lids for them are $1.99 each for a total of $50.55. You might be able to find cheaper buckets, especially if you can find a local source. I had a great one for a while; the bakery I mentioned above. They kept all used buckets and sold them. Other places I found are willing to give them away but getting to them before they throw them out was a trick!
 
 
Storage Space

All of the buckets that I have are 3-gallon. If you have 5-gallon buckets, you’ll be able to fit more food in the same footprint. As you can see in the image, eight 3-gallon, plastic buckets take up a bit more room than the garbage can. If you have 5-gallon buckets, they’ll obviously stack higher than the garbage can.

I can usually fit 4 full 1-gallon Mylar bags in a 3-gallon bucket. In the picture, I have 32 full Mylar bags in the buckets. I have 22 full Mylar bags in this garbage can. I think I could probably fit 25 in if I tried.

One idea I have is to cut a thick piece of plywood, wide enough to cover the entire opening of the garbage can. This would allow stacking items on top of the can, allowing more storage space. You could place cans side by side and do this with as many cans as you like or have room for.

For those of you with pets, we are able to fit two 38-pound bags of dog food in one can!
 
 
Final Thoughts

We use a mix of both buckets and cans. The cans work nicely and are cheaper than buckets in many cases. The only real downside to buckets is the weight. If we decided to bug out and wanted to bring the contents, we would have to partially empty the can and then carry it out to the truck and trailer.

 
Please click here to vote for Prepared Christian as a top Prepper site!

If you liked this article please think about sharing it on the social media listed below, thanks!
Preparedness Club

Food Stamp Cuts Starting November 1st

Food Stamp Cuts

Not long ago, I posted an article called Nine Meals From Anarchy; a Food Stamp Melt Down. In it I explained that there has been looting and small outbreaks of violence in the past when there have been problems or delays with the food stamp system. I also made the point that I think the reason violence and looting were not sparked into large scale rioting was because of “nine meals”.

I mean “nine meals” both figuratively and literally. Figuratively in the sense that, to date, the problems with the food stamp system have been corrected within a day or two at most. Literally because when people go hungry for three or four days in a row, they tend to act on it.

“If you look across the world, riots always begin typically the same way: when people cannot afford to eat food,”

That is a quote from Margarette Purvis, the president and CEO of the Food Bank for New York City, in an article from Salon.com. The article goes on to say that:

“Purvis said that the looming cut would mean about 76 million meals “that will no longer be on the plates of the poorest families” in NYC alone – a figure that outstrips the total number of meals distributed each year by the Food Bank for New York City, the largest food bank in the country. “There will be an immediate impact,” she said.”

In the last five or six years we have seen civil unrest and rioting due to the price or unavailability of food and the cutting of government entitlements in the following countries; Bolivia, Egypt, England, Greece, Guinea, Haiti, Indonesia, Italy, Ivory Coast, Mauritania, Mexico, Morocco, Mozambique, Senegal, Spain, Tunisia, Uzbekistan and Yemen.

You might be thinking that the people in those cultures are different that the American citizenry. I disagree! I think people are people, hunger is hunger and entitlement is entitlement.

The following video from Fox News says that the government is spending $80,000,000 to prepare for potential riots related to the cutting of food stamps. Here’s a thought; money is tight, so we have to cut food stamps, but we’re going to spend $80 million to prepare for possible riots because of this cut.


What Can We Do?

For starters we can remain calm and wait to see if anything does happen. Just in case, prudence might dictate that you get any grocery shopping you might need done before Friday. Keep in mind that we very well might not see any unrest on November 1st but we could see situations later in the month, when the realities of the cuts are felt.

I have covered what civil unrest might look like in What Does Civil Unrest Look Like and How Can You Stay Safe Near It? If there are riots, keep a safe distance and be prepared to defend your family. Also be on the lookout for the police response. I covered some of how the government has been gearing up for civil unrest in Government; the Good the Bad and the…What are They Planning

We can donate food to local food shelves or churches to help them meet the needs of the destitute. This is a much better option than giving the food out yourself.

Above all else, we can pray. Pray for those who are in legitimate need and will now not have food to put on the table. Pray that those who might be taking advantage of the system would change their ways. Pray for one another, that we may be blessed with wisdom and knowing God’s will as we prepare and navigate our future.

 
If you liked this article please think about sharing it on the social media listed below, thanks!
PreparednessClubOne

Living Off The Land: Delusions and Misconceptions About Hunting and Gathering

The Following article was written by Ross Gilmore and is reposted with his permission.  The original article can be found here at his site, Wood Trekker.

From time to time I will see someone say that their bug out plan is to head to the woods and live off the land.  I have always thought that this was a bad idea, but only had conjecture to back up my opinion. Rob has done a fantastic job of crunching numbers and shows just how much someone would have to hunt and gather to bring in enough calories.


Living Off The Land: Delusions and Misconceptions About Hunting and Gathering


Ah, living off the land. Thriving in the wilderness with the use of your skills. It is the ultimate goal of many bushcrafters and survivalists. Numerous posts have been written on forums about this subject, and as soon as one ends, another is started. Of course, actual evidence is rarely presented. We often fall back on positions such as “our ancestors did it, so clearly I can do it”, or “I was out last week and saw a bunch of cattails and barriers, so my food sources are secure”.

The problem is not made any better by so called experts in the field, who fuel the myth that they are feeding themselves in the wilderness. I vividly remember watching Andrew Price, host of A-Z of Bushcraft in one of the episodes, waking up in the morning, walking a few feet next to camp, gathering a few berries, and then turning the the camera and saying “breakfast is served”. Ray Mears, aside from his excellent series, Wild Foods, has numerous instances where he gathers meager resources and then implies that his food requirement have been met. Of course, none of them ever bother to calculate or present actual caloric values, or discuss the long terms consequences. Similarly, people like Dave Canterbury, who discuss at length hunting in wilderness living conditions, never actually do the math of how much game has to be killed to justify the weight of that shotgun being carried, or whether the numbers would work out at all.

For the past year I have been attempting to gather some actual numbers on the subject, so we can have a more meaningful conversation about what it would take to sustainably feed a person in the wilderness, and consequently, what tools may be suited for the task. I must admit, I have been slacking with the project because of its tedious nature. Last week however, a reader referred me to a source related to the Chris McCandless post, which provided me with some of the information I was searching.

Samuel Thayer, author of the books Forager’s Harvest and Nature’s Garden, wrote an essay related to the starvation of Chris McCandles titles Into the Wild and other Poisonous Plant Fables. While much of the essay focuses on disproving theories of poisonous plants, the last section discusses actual caloric requirements for a person living in the wilderness, and what resources that would require.

So, let’s assume a scenario where a person will be going into the wilderness with the intention of living off the land. He will practice wilderness self reliance, he will thrive in nature, and whatever other cliché you want to insert here. Let’s also assume for the moment that there are no hunting or fishing regulations that we have to comply with, and let’s assume that the person has all necessary equipment, including hunting and fishing tools. What would the person need to procure each day in order to live in a sustainable manner for a prolonged period of time?

Well, the first piece of the puzzle is the required calories. Citing Michele Grodner’s Foundations and Clinical Applications of Nutrition, Thayer calculates that a male who is physically active under wilderness living conditions would need approximately 3,300 calories per day. This number seems consistent with calculations done by long distance backpackers, who usually aim for a bit over 3,000 calories per day. So, to maintain one’s physical condition, and prevent weight loss, the person in question must consume about 3,300 calories each day. Of course, there are other nutritional requirements, but at a very basic level, to prevent death from starvation in the long run, this caloric minimum must be met.

The above caloric requirement for wilderness living should not be confused with accounts of short term survival, where a person stays in the wilderness, slowly losing body weight, until they are rescued. We have plenty examples like this from series like Survivorman, Naked and Afraid, etc. Those are not examples of sustainable hunting and gathering situations, and we should not have any delusions about the long term applications of such a starvation diet.

So, sticking with the 3,300 caloric requirement per day, what would it take to meet these caloric needs?


Sources of Calories

Meat

First let’s look at animal products, something to which I will jointly refer to in this post as “meat”, but should be understood to include both protein and fats. Meat can vary in caloric content anywhere from 40 calories per ounce for lean meat like squirrel and rabbit, all the way to 60 calories per ounce for very fatty meat like salmon. Using these numbers, we can roughly calculate the caloric value of each animal, and how much of it we would need to meet the our daily caloric requirements.

Red Squirrel: as Thayer calculates, at an average of 2.8 ounces of meat per squirrel (Michele Grodner’s Foundations and Clinical Applications of Nutrition), it would take 25 squirrels per day to meet the caloric requirements, or if also eating the internal organs and brain, about 16 squirrels per day.

Rabbit: at about 16 ounces of meat per rabbit (Michele Grodner’s Foundations and Clinical Applications of Nutrition), you would need about 4 of them per day, or 3 if eating all of the organs and brain.

Salmon: assuming you are catching Sockeye salmon, they average 6 pounds (96 ounces) (Kenai Peninsula Borough Commercial Fishing Industry State Records, 2012). Since salmon meat is rich in fat, we can assume 60 calories per ounce (USDA SR-21), which would mean one salmon would give you 5,760 calories, or a little under two days of food.

Clams: clam meat varies in caloric density from about 33 calories per ounce to about 42 calories per ounce. (Interstate Shellfish Sanitation Conference, 2013). To satisfy the required 3,300 calories per day intake, you would need about 5 pounds of clam meat per day (using 40 calories per ounce for the calculation). In order to get 5 pounds of clam meat, you would need about 320 medium size clams. For each ounce of meat, you need about 4 medium size clams. (Interstate Shellfish Sanitation Conference, 2013)

Raccoon: while many people would not eat raccoon meat due to its high content of parasites, it is technically edible. The meat is fatty, averaging about 72 calories per ounce. (USDA SR-21) The weight of raccoons varies widely from 10 to 25 pounds for adults. The average listed size is about 25 pounds for an adult. That should provide approximately 10 pounds of meat once it is gutted, skinned and deboned. At 72 calories per ounce, such a raccoon will provide about 11,520 calories. However, keep in mind that these numbers reflect the calories if the animal is cooked to preserve all of its nutrients. In order to make it more palatable, people usually cook raccoon meat to remove most of the fat. If you do that, the caloric content will drop significantly. Assuming you save all of the fat however, a 25 pound raccoon should provide sufficient calories for 3.5 days.

Turkey: a good size turkey will yield about 10 pounds of meat (160 ounces) when processed. The caloric value of processed turkey meat is about 45 calories per ounce (USDA SR-21). Therefore, a turkey will produce 7,200 calories in total, or a bit more than 2 days worth of caloric requirements.

Deer: a mature buck typically yields about 70 pounds of meat (1,120 ounces) (University of Wisconsin study 2006). Venison is a lean meat, with about 53 calories per ounce (USDA SR-21). The meat of a mature buck will therefore give you 59,360 calories, which will be sufficient for 18 days of food at the 3,300 calories per day requirement. If you are eating the internal organs as well, that will probably get pushed to about 20-21 days of food.

Black Bear: a large black bear will produce about 100 pounds of meat (1,600 ounces) once processed. Bear meat has about 43 calories per ounce. (USDA SR-21) So, a large black bear will give about 68,800 calories total. That would be sufficient calories to satisfy the caloric intake for 21 days. 

The table below gives a general summary of the results. The numbers you see in the last column for animals needed each day to meet the caloric requirement, the number in parenthesis represents what is needed if internal organs are preserved and eaten as well as the meat. 


Meat

   
Type of Animal oz of Meat/Animal cal/oz of Meat Total cal/Animal Animals/Day
Squirrel 2.8 47 132 25 (16)
Rabbit 16.8 47 790 4 (3)
Salmon 96 60 5,760 0.57
Clams 0.25 40 10 320
Raccoon 160 72 11,520 0.29
Turkey 160 45 7,200 0.46
Deer 1,120 53 59,360 0.056 (0.05)
Black Bear 1,600 43 68,800 0.047


Plants

Now, let’s move to plant sources.

Cattail Roots: cattail roots, will yield about 8 calories per ounce (USDA SR-21; Revedin, A., et al. Thirty thousand-Year-Old Evidence of Plant Food Processing, 2010). This means that about 413 ounces or 26.5 pounds of cattail flour would be needed to meet that daily caloric requirements.

It should be noted (as pointed out by a reader in one of the comments) that Table 2 of the above study, Thirty thousand-Year-Old Evidence of Plant Food Processing, 2010 provides that cattail (Typha) rhyzome flour contains 266 kcal/100g, or 75 calories per ounce. That is much higher than the 8 cal/oz provided by the USDA and other sources. It appears the difference occurs because that table speaks of the caloric value of already processed and cooked flour. The article specifies that “The flour would have undergone a multistep processing involving root peeling, drying, and finally grinding using specific tools. After this, the flour needed to be cooked to obtain a suitable and digestible food.” Cattail rhyzome contains large portions that are inedible, such as the spongy layer covering the rhyzome as well as the fibers from which you have to remove the starch. As such, the numbers don’t appear to be contradictory. You may very well have a caloric value of 25 kcal/100g (8 cal/oz) for cattail root and 266 kcal/100g (75 cal/oz) for processed cattail root flour where the outer casing has been peeled, the fibers have been removed, and the resulting starch cooked. In the table here I have used the number for unprocessed cattail root, and the quantity you would need to get the necessary calories.

Parsnips and Similar Wild Roots: according to Thayer, at approximately 23 calories per ounce (Michele Grodner’s Foundations and Clinical Applications of Nutrition), about 9 pounds would be needed per day to meet the daily caloric requirement of 3,300 calories.

Blueberries: again, according to Thayer, at about 16 calories per ounce (Michele Grodner’s Foundations and Clinical Applications of Nutrition), you would need 13 pounds of blueberries per day to meet your caloric requirements.

Lingonberries: at about 5 calories per ounce (USDA SR-21), you would need about 41 pounds of lingonberries to meet your daily caloric requirement.

Acorns: once processed into a flour, after leaching out the tannic acid acorns will provide about 110 calories per ounce (USDA SR-21). That would mean that 30 ounces, or a little under 2 pounds of acorn flour would be needed per day to satisfy the caloric requirements.

Burdock Root: at about 20 calories per ounce (USDA SR-21), you would need about 165 ounces, or 10 pounds of unprocessed burdock root to meet your daily caloric requirements. If cooked, a large amount of the water removed, the pounds one needs to consume may be significantly reduced, but would still constitute more than what a person can eat in a day.


Plants

 
Type of Plant cal/oz of Plant Material Pounds Per Day Needed
Cattail Root (Unprocessed) 8 26.5
Parsnips 23 9
Blueberries 16 13
Lingonberries 5 41
Acorns (processed) 110 2
Burdock Root 20 10*


The above represent average numbers, both for the calories required per day, and the amount of food which must be consumed to provide those calories. Variations should be expected. Even so, it is evident that a person attempting to live alone off the land in the wilderness has a serious challenge on his hands. The amount of food required seems absurd, but as Thayer explains: “If this seems like a high volume of food, that’s because it is. We have sought, developed, cultivated, and become accustomed to calorie-dense foods for so long that most of us have never been without them. We’ve never had to eat food in volumes like this. When you realize that a stick of butter has as many calories as two and a half quarts of blueberries or seven pounds of broccoli, you can see why the innate human desire for calorie-rich, low-fiber food developed.


Gathering

The gathering of food has become a great area of teaching for survival and bushcraft instructors. Unfortunately, much of the teachings create a false impression of what it actually takes to feed oneself through gathering of food in the wilderness. As Thayer also noted, many such instructors teach, or imply through their representations that a very small amount of food is needed for a person to sustainably live in the wilderness. Whether the misrepresentations are intentional, or due to lack of knowledge is hard to say, but the results are the same-people fail to realize how much food must be gathered to sustain a person long term.

We have to make a clear distinction between “edible” plants and “food”. Just because something can be eaten, does not mean that it contributes to your caloric requirements in any meaningful way. Many staples of bushcraft teachings, such as dandelions provide virtually no caloric value. You can easily starve to death with a stomach full of such plants. In fact, it is not unlikely that a person may spend more energy gathering edible plants, than the calories he will get from consuming them. To effectively gather food in the wilderness, one has to know not only what is edible, but also what provides meaningful calories.

From the plants available and listed in the above chart, not surprisingly acorns provide the highest nutrition. I imagine it will be similar for other nuts because of the high oil content. If processed correctly, a person can certainly provide enough food for himself using acorn flour. The other plants that are readily available, including the all too popular cattail and burdock roots, are far less than ideal when it comes to providing sufficient calories for a person attempting long term living. Not only would it be difficult to supply yourself with enough of the plant, but consuming such large quantities would be impossible. We should also keep in mind that the plants I have listed here are the ones with relatively high caloric value.

On that subject, Thayer writes with respect to Chris McCandless, “If he didn’t get any meat, couldn’t he just eat more lingonberries and get all his calories that way? Absolutely not. He would have needed to eat almost three gallons of lingonberries per day. He’d probably be vomiting before finishing the second quart. No matter how many lingonberries were available to him, his body would have only accepted them for a small portion of his caloric requirement. This doesn’t make lingonberries “poisonous”; the same is true of virtually every food, although the appropriate proportions vary… The concept that foods can be eaten only in appropriate quantities is taken so much for granted that, to my knowledge, it has never been given a name in the medical literature. I call it themaximum caloric proportion (MCP). Some foods have a very high MCP, such as milk, meat, and potatoes. They are easily digested and contain few antinutrients or toxins, thus they are suitable as dietary staples. Others, such as cabbage, rhubarb, and raspberries, cannot serve as staple foods and are only suitable to supply small portions of the diet. As one travels north, there tends to be fewer plants with a high MCP; this is why hunter-gatherers from northern latitudes ate meat for the great majority of their calories.”

As a result, if you can not find the right plants and gather it on a large enough scale, or have simply missed the gathering season, one typically has to resort to meat for the majority of the required calories. So, let’s look at some of what is required in terms of providing sufficient calories through hunting and fishing.


Opportunity Cost of Hunting and Fishing

Before we look at specific examples, it is important to note that when we speak of hunting and fishing, activities which require that you bring specific equipment into the woods, we have to look not only at what you can successfully hunt, but also at the opportunity cost of that equipment. What I mean by that is that for each pound of equipment which you bring with you, you have to forego a pound of some other resource which you could have brought with you instead. Since we are assuming a person who is otherwise prepared for the wilderness, the most immediate opportunity cost is food. For each pound of gear that you bring, you have to leave behind a pound of food. So, when you bring a 7 pound rifle with you, you could have instead left it behind and brought 7 pounds of food. So, when we look at the equipment one may bring for such hunting, we have to see not only if it can get us any food, but also whether the food we can procure with it is more than the food that we could have brought with us had we not brought the equipment.

To complicate things further, we have to look not only at the weight of the food, but more importantly at the caloric content of that food. So, a pound of squirrel meat will give us 752 calories. On the other hand a pound of instant mashed potatoes will give us 1,664 calories. For this post, I will use mashed potatoes as a base line for calorie dense food that could have been brought into the woods. 


Fishing

First, let’s look at fishing. Fishing is a good way to procure calories because the equipment required is not heavy, and is relatively reusable. A large net, fishing rod, reel, lures, and a sizable spool of line will only add up to a few pounds. You guys have seen my lightweight fishing kit, which came in under one pound. A more robust and complete kit can be estimated to around 3 pounds. 3 pounds of gear has the opportunity cost (using the above base line numbers) of 4,983 calories, or about day and a half of food at the required 3,300 calories per day. From a simple numbers standpoint, this means that the first day and a half worth of food that you catch will go to offset the weight of the gear (which you brought rather than bringing food). Everything you catch after that is surplus.

The downside of fishing of course is the limited availability of resource reach areas. For example if you are lucky, and are in an area and the right time for a salmon run, as we saw from the above numbers, a single sockeye salmon will give you about two days worth of food. That means that the first salmon would offset the opportunity cost of the fishing gear, and every subsequent one will be pure food value. If you can catch one every two days, you will be able to meet your caloric requirements. The problem of course is that you may be a week late, and not find a single salmon because the run has ended; or, you may be in an area where no such fish is available; or you may be in an area where there is no body of water which carries any sizable fish at all.

Remember, it takes about 3.5 pounds of salmon per day to meet a person’s caloric requirements. If instead of a 7 pounds salmon, you were pulling out 3 ounce sunfish out of the water, the calculations would be very different. At approximately 50 calories per ounce of fish meat, you can do your own math to see how much fish you would need. I remember an episode of Ray Mears Extreme Survival where he caught a small fish while he was in the Rockies, and prepared it with some plants. It may seem like he has prepared a good dinner, but the reality is that the meal probably contains less that 300 calories, about a tenth of what is needed for the day if we are facing a long terms sustainability situation.

Even with all those considerations however, if you have selected an area close to a sizable body of water for your long term wilderness living situation, fishing is a good way to procure food because of the low weight and reusable nature of the gear, as well as the low amount of energy expenditure required.


Hunting

Now, let’s look at hunting as means of procuring food. Obviously, a hunter needs his tools. There are a lot of misconception from people who do not hunt that you can use primitive weapons, constructed in the woods, to effectively hunt. The difficulty of such a task is nearly always underestimated. Thinking that a person can construct a stick bow, or carve a longbow in the woods from an unseasoned piece of wood, and then go hunting with it in an effective manner is wishful thinking. Keep in mind that a hunter with a modern state of the art bow, with modern optics and range finder, will rarely take a shot at over 50 yards. If you are hunting with an improvised bow, lower that range to about 25 yards. Now, go measure out 25 yards and try to think of what it would actually take for you to get to within 25 yards of a deer. Then, think of what accuracy would be needed to hit a squirrel at 10 yards with that same bow. You will quickly gain a healthy appreciation for modern weapons.

Most people who are contemplating long term wilderness living will use some type of firearm, much like Chris McCandless did during his attempt. In recent years, Dave Canterbury, former co-host of Dual Survival, has popularized the single show 12 gauge shotgun as a weapon for long term wilderness living. In this post I will not address any issues regarding whether I believe that to be the best choice, but I will simply use it as a base line for purposes of discussion. A single shot 12 gauge shotgun weighs approximately 6 pounds (H&R Topper Deluxe with synthetic stock). Using the number we previously calculated for calories per pound of food which we could have brought into the woods (1,664 cal/lb), we can calculate that a 6 pound shotgun has the opportunity cost in terms of food of 9,984 calories, or about 3 days worth of caloric intake. That would mean that the first three days worth of food which you kill will go to offset the weight of the gun (keeping ammunition weight aside for now). So, if your trip is less that three days, even best case scenario (you being able to successfully kill enough game each day to meet the 3,300 calories per day requirement), you would be better off simply bringing your food with you. That way the availability of food is guaranteed.

For trips longer than three days, the gun would theoretically be the better bet, assuming you can secure enough food with it. So, let’s look at what that would entail. Let’s assume that you are now hunting small game with lightweight shotgun shells (2 3/4 shells with 1 oz load). Each such shell weighs 1.4 oz. So, for each shell fired, we have to add that weight to the opportunity cost, meaning, for each box of shells, we could have simply brought food with us. We than have to see if the numbers work out.

As I was saying, let’s assume you are hunting small game. As we established earlier, it would take 25 squirrels to provide enough meat for a day’s worth of calories (3,300 cal). Killing 25 squirrels with the above ammunition would require 35 ounces of shotgun shells. Using our caloric value for instant mashed potatoes from above at 104 calories per ounce, the same 35 ounces if brought in the form of mashed potatoes instead of shotgun shells would give us 3,640 calories, more than what you would get from the squirrel meat. That means that if you are hunting squirrel with shotgun shells, you will never procure enough meat to offset the weight of the gear that you have to bring. You will be better off bringing food with you rather than the equivalent weight of ammunition. That is not to mention the weight of the shotgun itself, for which you could have brought an additional 3 days worth of food.

The numbers of course look much better when we consider larger game. If we are hunting rabbit, 4 of them would give us the caloric requirement for a day. That would mean we would have the expand 4 shotgun shells, at a total weight of 5.6 ounces. The equivalent weight of mashed potatoes will only give us 582 calories. In that instance, again, assuming perfect accuracy and availability of sufficient targets, the shotgun will be the better bet. The numbers of course look even better when hunting large game like deer.

A possible way to address the problem with small game hunting is to use different ammunition. While a shotgun shell weighs 1.4 oz, a .22LR cartridge weighs 0.1 oz. 25 squirrels will require only 2.5 ounces worth of .22LR cartridges, making it a viable option. The solution proposed by Dave Canterbury is to carry an adaptor, which inserts in the shotgun, allowing you to fire .22LR bullets. While the approach is viable in theory, if that is the route you chose to take, keep in mind that this is quite possible the least accurate way to fire a .22LR bullet. A non properly bedded, 10 inch rifled insert will give only marginal accuracy, made even more difficult by aiming only with the aid of a bead sight. You should adjust your ammunition count accordingly. After all, the goal here is to kill game, not to just fire ammunition.

Lastly, all of the numbers provided in this post assume 100% accuracy and unlimited availability of any particular resource. Obviously that is not the result in reality, but here I am assuming best case scenario. Success rates for hunting, or hunting strategies are beyond the scope of this post. The only thing I will say on the subject is to be careful when extrapolating success rates for a wilderness living situation based on anyone’s success rate when hunting closer to home. A lot of hunting these days is done on people’s personal property and close to civilization. That has a huge impact on game centralization. Food plots, open terrain of farms, fields, and roads are a great attractant to animals, which in turn become familiarized with people. Hunting in such an area is very different from going deep into the woods and attempting the same thing. One way is not necessarily better than the other, but there is a danger in trying to extrapolate your possible success rate when hunting in a wilderness living situation based on success rates in the woods behind the house.


Trapping

I have added a trapping section to the post since I first published due to several comments requesting information on the subject. The reason why I didn’t originally include a section on trapping is that an animal caught through trapping has the exact same caloric value as an animal caught through hunting. The ease of hunting, trapping, or gathering is beyond the scope of this post. For all of the numbers I have presented here, I have assumed 100% success rate and infinite availability of the particular resource.

I will discuss a few of the legal issue involved with trapping, but I will mention a few things here.

First, it is very hard to get data on trapping in the wilderness. The reason is that most trap lines are run close to home for reasons I will explain in the section on legal considerations. As a result, it is hard to find data from an actual wilderness trap line, so some of the aspects of trapping during long term wilderness living are hard to address.

Also, just like with hunting, be careful when extrapolating success rates for wilderness trapping conditions based on trap lines run close to home. Around where I live, there are large numbers of raccoons. I saw five of them walking through the parking lot two weeks ago. It is a different story when you are actually in the forests.

As I will explain below, trapping, just like hunting, requires gear. You will have to bring your traps with you. What traps you use and their size will vary greatly depending on what animal you are trapping and where you are doing it. Factor that weight into your calculations and determine the opportunity cost to see if the numbers work out under the specific conditions.  


Legal Considerations

Lastly, we have to get back to that issue which we put to the side earlier, the law. Assuming we do not wish to be poachers, and are actually contemplating living in the wilderness within the real world rather than some imaginary scenario, we have to comply with regulations. Hunting seasons will vary trough different areas, but for most species, especially large species, it will be quite limited. For example, in the State of New York (southern region), deer and bear seasons are from Nov 16 – Dec 8; turkey season is from Oct 1 – Nov 15 in the fall and May 1 – May 31 in the spring; cottontail rabbit is from Oct 1 – Feb 28; gray and fox squirrel is from Sept 1 – Feb 28; grouse is from Oct 1 – Feb 28, etc. There are a few species that can be hunted year round, such as red squirrel, porcupine, rock pigeon, and woodchuck. As you can see however, the limitations are severe.

Above we calculated that a mature white tail buck will give us about 21 days worth of calories if properly processed and preserved. Let’s assume that you can supplement it with other sources of food, and extend that time to a month. If you are hunting deer lawfully, that would mean that to provide sufficient calories for the full year, between the dates of Nov 16 – Dec 8, you will have to kill 12 mature deer in that 3 week period. You have to average 4 deer per week. The practical difficulty with such a task is not the only problem. Most states have restrictions on the number of deer that can be harvested. In NY it is usually 1 or 2 per year.

Now, using New York State as an example, let’s see if the necessary calories for a person for a period of one year can be legally acquired through hunting. The generally available large game would be deer, bear, and turkey. In certain areas, the hunting of other large game like elk, moose, duck and geese may be legal and available. In NY we have good access to duck and goose hunting, but no elk or moose hunting. So, let’s look at the generally available game. Let’s assume that you have two buck tags, one bear tag and four turkey tags (two spring and two fall).

One black bear gives us 68,800 calories. Two bucks, at 59,360 each will give us 118,720 calories. Four turkeys at 7,200 calories each gives us 28,800 calories total. Combined, the bear, deer, and turkey give us 216,320 calories for the annual hunting season.

The caloric requirements for one person for one year based on the 3,300 daily requirement we used above, would give us 365 days times 3,300 calories per day, for a total of 1,204,500 required calories per year.

So, assuming you are a skillful hunter, and luck was on your side, and you managed to fill all of your tags (one black bear, two deer, and four turkey), that will still leave you at a caloric deficiency for the year of 988,180 calories. In other words, you will have no food for 299 days out of the year. If available in your area, you may be able to decrease the deficit by hunting other large game if available, like elk, moose, and duck, although, it appears that a large deficit will remain.

Just to give some perspective, assuming that a duck or goose provides the same amount of calories as a turkey, it would require 137 ducks or geese to satisfy the above caloric deficit (assuming no legal limit on the number you can harvest). Assuming you are hunting those ducks with a 3 inch shotgun shell with a 1 3/4 load, which weigh 2.2 oz each, and assuming perfect accuracy, that would require about 19 pounds of ammunition.

On the other hand, you will have to kill or trap a whole lot of squirrels to make up for the deficiency, approximately 7,486 squirrels, which if hunted with .22LR ammunition, and assuming perfect accuracy, would require about 47 pounds of ammunition.

Trapping is also an option, but you have to keep a few things in mind. First, trapping, just like hunting is regulated and only allowed during certain seasons. Second, the way you can trap is heavily regulated. Deadfalls, snares, hooks on trees, and virtually all DIY traps are not allowed. The regulations are very specific as to exactly what trap you must use for each animal. Third, trapping is generally only allowed for furbearers. In most areas you are not allowed to trap game animals. Some furbearers like beaver are edible, others not so much. Last but not least, regulations typically require that you check all of your traps every 24 or 48 hours. For most people that places serous restrictions on where traps can be placed and limits the size of the trap line. The result is that most trap lines are run close to home with the few exceptions for people who travel deep into the woods and then live there for the trapping season.

The alternative is that you need to systematically exploit another abundant resource such as large scale gathering and processing of acorns when in season, or moving to take advantage of large scale fish migrations and then catching them with nets, fishing wheels, etc. where the law allows.

Do the numbers work out? You do the math. I think we get a better appreciation for why high calories foods such as pemmican and corn meal were so highly valued and commonly carried by woodsmen in the past.  

I don’t write this to discourage anyone from attempting the challenge, nor do I believe it to be impossible. In this post I am simply attempting to provide some more solid data that can be used to make a realistic evaluation of exactly what it would take to thrive alone in the wilderness. As Thayer writes: “In a long-term subsistence situation, food is the priority. In former times, the native people of the Far North planned each move according to food availability… In a short-term survival situation, food is of minor importance. However, in long-term survival or “living off the land,” it is of paramount importance.”

There was a time when men who ventured into the wilderness knew what resources were required, and how much of them had to be brought along. Their accounts often refer to base camps, cabins, and food stocks being carried on horse back, mule train, or by dog sled teams. Somewhere along the way we seem to have lost the realistic grasp on those requirements, and were left with nothing more than romantic musings and conjecture. 


The Pantry Primer: Building Your Pantry on a Budget with Home Canning

This article was written by Daisy Luther the Organic Prepper and was originally posted here.

home canning

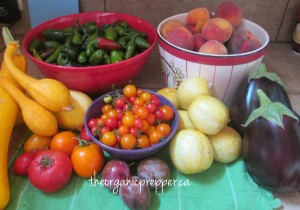
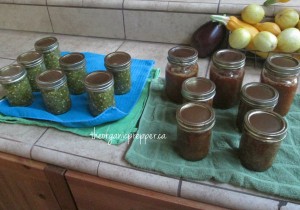
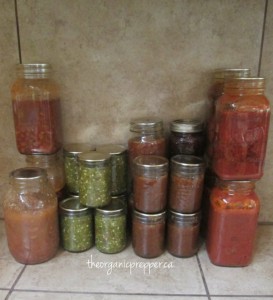
One of the best ways to build your healthy stockpile is to preserve local organic foods when they are in season.  My favorite way to do this is canning.

When you can your own food, you can make delicious entrees and side dishes that can be served as quickly as you can boil water – and the best part of all is that you know exactly what is in those shiny jars. (See The Canning Manifesto to read more about why I choose to can so many foods!)

Making home-canned foods can be a great way to cost-effectively build your pantry for several reasons:

  • You can buy in bulk
  • You can take advantage of good sales, like “last day” sales
  • You can buy what is in season at better prices than when it is out of season
  • You can put together “quick meals” far less expensively than buying processed foods by doing a big batch of home cooking to be reheated and eaten at a later date
  • You don’t risk losing your stockpile to the vagaries of the power grid like you would by using your freezer

When my daughter eats a biscuit with jam, I know that it only contains organic peaches and sugar. There are no GMOs lurking, no High Fructose Corn Syrup, and no artificial colors and flavors.

Lots of meals for very little money

You can get a lot of bang for your buck by home canning. I recently canned some “meals in a jar” – check out what I spent:

$10 = 7 quart jars of spaghetti sauce with meatballs

$4 =  6 quart jars of Boston Baked Beans

If you were to purchase those items in grocery store cans you’d be spending far more money for far less quality.

This week I have been concentrating on building my pantry with home-canned goods.  I’ve made:

I made all of the above for about $35 not including snap lids and spices, which only add nominally to the cost.

Here are some ways to save money by canning

garden exchange

  1. Don’t decide ahead of time what you are going to can.  It’s okay to have a general idea, but if you have specific recipes that require specific ingredients beyond your pantry basics, you may end up spending a lot of money. For example, yesterday I went to a garden exchange and swapped some money and some home-canned goodies for other people’s surplus produce.  When I got the items home, I took a look at my bounty and decided what to make based on that.  Had I gone to the store or market specifically looking for certain things, I would have spent far more.
  2. Always fill your canner.  If you only have enough ingredients for 5 jars of whatever your making, but your canner holds 7 jars, fill the other two jars with beans.  You’re using the same amount of electricity or gas whether the canner is full or not.
  3. Buy as much as you can when things are inexpensive.  Today I’m heading to a local orchard that has a huge sale on just-picked pears.  They’re selling boxes of pears (about half bushel sized boxes) for $9 – and it gets better – they’re buy one, get one free!  So this means we have some delicious local fresh fruit and enough left over to fill many jars.
  4. Cook in bulk and can your leftovers.  The holidays can supply an enormous amount of ingredients for your home canning endeavors.  Also, as the weather cools off, make double batches of chili, soups, and stews and put the leftovers into jars for later use.
  5. Learn to can with what you have on hand.  Going along with tip #1, be flexible and learn to adapt the ingredients you have on hand in canning.  Here are some instructions on how to can your own recipes and how to make jam from whatever fruit you have in abundance.

canning

Here are some helpful links:

Go HERE to find tons and tons of my canning recipes and how-tos.

Go HERE to learn about water bath canning.

Go HERE to learn about pressure canning (a necessity if you are canning anything besides fruits, salsa, pickles, and jam).

Go HERE to learn how to sanitize your jars.

Go HERE to learn how to adjust for the altitude where you live.

Also, check out these great websites for more canning ideas:

Ready Nutrition

Simply Canning

Prepared Housewives

Food Storage and Survival

The Survival Mom

Pick Your Own

If you have any questions about canning, please don’t hesitate to ask – canning one of my favorite things to do and I could talk about it endlessly!

canned food

If you liked this article please think about sharing it on the social media listed below, thanks!
PreparednessClubOne

8 Major Differences Between Freeze-dried and Dehydrated Food

Chris Say’s: While freeze-dried food does have many pluses over dehydrated food, I don’t agree with everything in the article. One of the major pluses of dehydrated food is that you can do it yourself at home and at a fraction of the cost of freeze-dried food. I think both have their places in food storage and it is important to know the pluses and minuses of each.

8 Major Differences Between Freeze-dried and Dehydrated Food

1. Processes. First of all, the process by which each is made is different. Freeze-dried food is flash frozen and then put in a vacuum container causing the water vaporize, and leaving the food item with 98% of its water removed. Dehydrated products are heated and water evaporates, leaving the food item with 75% of its water removed. These differences in process mean that they both have different functions in your food storage.

2. Shelf-Life. Freeze-dried food lasts a lot longer without expiring because it has hardly any water left in it. On average, they tend to last between 20 and 30 years. Dehydrated foods still have 25% of its original water left in it, so they cannot stay good for nearly as long. They typically last between 1 and 8 years.

3. Additives. Freeze-dried foods don’t have any additives, but dehydrated food does. They usually need to add salt, sugar, or other preservatives to make dehydrated food.

4. Nutrition. Food retains all the nutrients that it had in its original form after the freeze-drying process. In the dehydration process, however, up to 50% of the foods’ nutrients can be lost because of the heat that the food is put under in the process.

5. Taste & Texture. Freeze dried food has a muted coloring and a dry, powdery texture before it is prepared, but once water is added the food has its’ original look, texture, and taste. Dehydrated food looks and tastes different than it was before the process. It also usually has a chewy texture.

6. Re-Hydrating. Since freeze-dried food was made to be re-hydrated, it is very easy to do. It can be done with cold or hot water, and after the water is added the food is just like the regular food item was frozen and then thawed. Dehydrated food wasn’t made for re-hydration, so it is extremely difficult. An example of doing this would be trying to turn a raisin back into a grape. If you do want to attempt this, it must be done with hot water.

7. Uses. Freeze-dried food is great to use as a substitute for fresh ingredients when cooking. It also comes in pre-made packaged meals like lasagna or orange chicken. There are limitless possibilities with freeze-dried; they even make freeze-dried icecream! Dehydrated food is a little more limited. It’s great as a snack by itself, but it doesn’t really go with recipes very well. The products that are dehydrated are mostly fruits, vegetables, and meats.

8. Cost. Because of the many benefits, freeze-dried food costs more than dehydrated food.

Both freeze-dried and dehydrated foods have their ups and downs, and they are both very good options for your home food storage. Click here to learn more about freeze dried food from Food Insurance.

Author Bio- Chett Wright is an emergency preparedness expert, and loves educating others on the how-to’s of food storage.

Consolidated List of Gardening Posts

It’s that time of year when many of us are gardening by traditional, raised bed, square foot, container or other method. I’ve written a few articles over the years that might be new to some of you. I thought I would write one condensed post and link to them all.

For those of you who aren’t gardeners, this is a skill you should really consider learning. Have you ever heard the phrase, “society is nine meals away from anarchy”? It’s true! It only takes three hunger filled days for things to begin to fall apart. The easiest way to control a people, is to control their food supply. Throughout history, tyrants have controlled their people by limiting the food supply.

Victory gardens were a common thing during WWII. People raised some of their own food to help reduce the burden on the food supply brought on because of the war.

I have been at this a few years and still consider myself a novice, but I am happy to share with you what I have learned.

“Principles of Gardening” is a great place to start. This article covers some of the basics, but I also cover some things that people who’ve had a traditional garden all their lives might not know. For instance, did you know that tilling your garden plot is counterproductive and actually harmful to the soil?

Over the years I have collected several books on gardening. I shared them in (-“Gardening Resources” and have updated the list with three new books.

Few of us have perfect soil for gardening. “Soil Amendments to Improve Garden Growth” has multiple ways to improve soil.

One way to make the most of limited space it to use a trellis for plants that grow on a vine. We’ve come up with a PVC Trellis for melons and beans.

In “Natural Ways to Kill Bugs and Weeds”, I list several ways to kill bugs and weeds without using pesticides or herbicides.

In “Introduction to Permaculture; Building a Food Forest”, I explain the basics of permaculture, which is a design system that uses principles found in nature. Instead of a traditional farm that may produce one or two items, a permaculture design might have a hundred different items. Permaculture design is often referred to as a “food forest”.

If you liked this article please think about sharing it on the social media listed below, thanks!
PreparednessClubOne

3 Dangers To Food Storage And How To Avoid Them

Today we have a guest post written by Lee Flynn

3 Dangers To Food Storage And How To Avoid Them

People tend to think that disasters don’t happen very often, or at least only happen to someone else. Of course, to someone else, we’re all someone else. And have you turned on the news recently? Tsunamis, earthquakes, hurricanes, wars… do you really think that your little corner of the earth is going to stay safe forever? If you want to survive the disasters that are sure to happen sooner or later, you’re going to need to prepare. In many cases, this means having a well supplied food storage. But stocking up on water and rations is only a part of the equation, because once you’ve got everything you need, you then need to protect it. Here are three dangers to your food storage, and how to overcome them.

1. Time

Just because something is called non-perishable, doesn’t mean that it will last forever. Canned goods only really have a shelf-life of about five years, at most, and Meals-Ready-to-Eat stay good for only about three years. Instead of relying on food that might spoil and leave you up a creek without a paddle, stick with freeze-dried and dehydrated foods, which last a good deal longer. Storing your food in the right place will also have a big effect on how long it lasts. That means that you should find someplace cool, dry, and dark. Also, make sure that the food is well packed in airtight containers, because exposure to oxygen can speed up the spoiling process.

2. Animals

Insects and other invertebrates are natural born food-storage thieves. They’re small, so they can usually get into any room or building that they want to. And guess what? they’d like nothing better than to burrow into your sack of flour and raise a couple thousand kids. But although you may not be able to keep these pests from getting to your storage room, you should be able to at least keep them out of the food. Store your food in secure plastic, metal, or glass containers, and be sure to clean up any spills as quickly as you can. Rodents such as mice or rats, and even larger mammals like raccoons pose a different threat. They might have a harder time breaking into the building, but with the help of gnawing teeth and dexterous fingers, they’ll have a much easier time getting into the food. Store all your food well off of the ground, and avoid using baited traps, as other pests might be attracted by the smell. Above all, be vigilant. Check your food storage repeatedly for signs of incursion. If you find damaged containers or infested food, discard it immediately, and replace it. Regularly clean out your storage area, and make sure to keep it free from crumbs and moisture that might catch the notice of uninvited animal guests.

3. People

No one likes to consider the possibility of having to defend their emergency storage from other human beings, but if a disaster occurs and food and water become scarce, then even the most kind and charitable individual will start fighting for survival. Looting has been known to happen regularly in the wake of disasters, and to a desperate and hungry person, there’s not much difference between robbing a grocery store and robbing a home. The best way to keep looters from taking your storage is to keep it secret. Only eat food at home, and never take it out into public where people might notice and be enticed by it. If possible, keep the area in which your food is stored locked, and keep the key well hidden. Don’t allow any strangers into your home, no matter how sorry you might feel for them, nor how friendly or harmless they may seem. And last but not least, be prepared to defend your food storage with lethal force, if need be. The thought of taking a human life over something like a few cans of stew or a jug of water is repulsive, but without that food, you or your family might starve.

Lee Flynn is a freelance writer, survival enthusiast, and food storage expert.

Survival Fishing

I haven’t fished much since I was a kid, mostly because I just don’t have the time.  I’m not going to cover the basics of fishing.  Instead, I want to go over some tactics for survival fishing.  Some of these ways to fish may or may not be legal in your area.  Check your local laws.  These are good things to have an understanding of.  If you find yourself in a survival situation, legal or not, you’ll do what you need to do survive.


Kit

I keep a mini kit in an Altoids Tin in my car.  In it, I have 25 feet of fishing line, some small sinkers, multiple hooks and some rubber minnows.  If I were to go hiking or find myself in a remote area, I would carry the kit with me.  I also carry a 100’ hank of para cord and a pocket knife.  I could make cordage and make a hook.  To me it makes more sense to carry those things, as they are so small and light weight.


Bait

Looking for bait should be fairly easy in non-frozen areas.  Turn over rocks and pieces of wood to look for worms and insects that you can put on a hook.  I have even read where people have successfully used flowers as bait.  Once you catch a fish, parts of it can be used for more bait.  One problem that might become an advantage is litter or trash.  If you have or can find a plastic bottle, you can turn it into a minnow trap.  The link shows bread for bait but worms or bugs should work as well.  Here is a link that shows how to make a lure out of a small section of paracord.


Trot Line

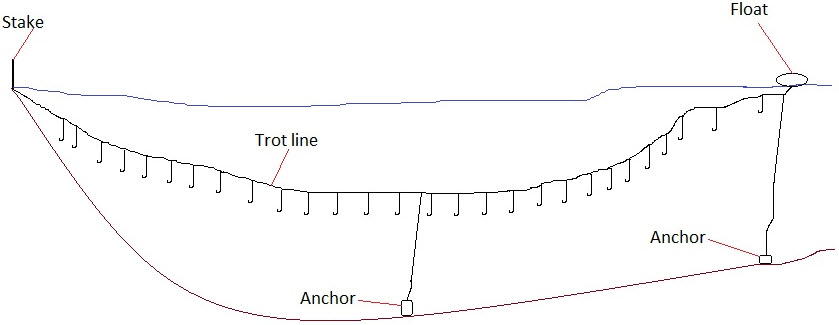
In a survival situation, there are a lot of things that need to be done.  While you could use traditional fishing methods, with a pole, line, hook and bait, that means you need to be there to watch the line.  With a trot line, once you have it set up, you’re free to go do other things.  As you can see from my very pretty (hand drawn by yours truly) image below, a trot line is basically one long strand of line with many smaller lines attached along its length and a hook at the bottom of each.  In my drawing, I have the line staked at shore, with one anchor in the middle keeping it all from floating to the surface and an anchor and float at the end keeping the line taut. You’ll need to bait each hook and keep them from getting tangled.  Leave it set for a few hours, when you start to “reel” the line in, hopefully you’ve caught more than one fish.

Trot line

Stakeout

This comes from the Army field manual on survival; FM 21-76.

“A stakeout is a fishing device you can use in a hostile environment (Figure 8-18). To construct a stakeout, drive two supple saplings into the bottom of the lake, pond, or stream with their tops just below the water surface. Tie a cord between them and slightly below the surface. Tie two short cords with hooks or gorges to this cord, ensuring that they cannot wrap around the poles or each other. They should also not slip along the long cord. Bait the hooks or gorges.”

Figure 8-18

Netting

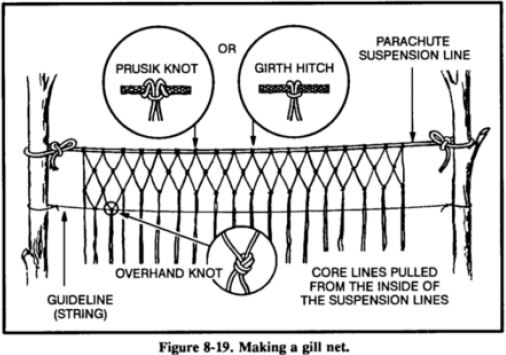
If you have the cordage, you can also make a net.  Paracord would work perfectly for this!  Take off the outer shielding, which gives you seven thinner threads.  I’ve never made a net, but below are some instructions from the Army field manual on survival; FM 21-76.  Granted, making a net is fairly labor intensive, but once it is made you can set it and check on it periodically.

“Gill Net

If a gill net is not available, you can make one using parachute suspension line or similar material (Figure 8-19). Remove the core lines from the suspension line and tie the easing between two trees. Attach several core lines to the easing by doubling them over and tying them with prusik knots or girth hitches. The length of the desired net and the size of the mesh determine the number of core lines used and the space between them. Starting at one end of the easing, tie the second and the third core lines together using an overhand knot. Then tie the fourth and fifth, sixth and seventh, and so on, until you reach the last core line. You should now have all core lines tied in pairs with a single core line hanging at each end. Start the second row with the first core line, tie it to the second, the third to the fourth, and so on.”

figure 8-19

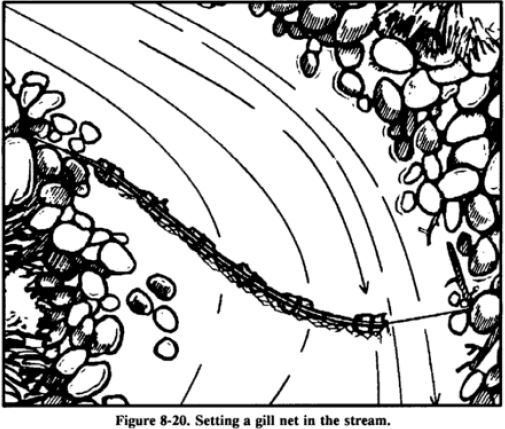
“To keep the rows even and to regulate the size of the mesh, tie a guideline to the trees. Position the guideline on the opposite side of the net you are working on. Move the guideline down after completing each row. The lines will always hang in pairs and you always tie a cord from one pair to a cord from an adjoining pair. Continue tying rows until the net is the desired width. Thread a suspension line easing along the bottom of the net to strengthen it. Use the gill net as shown in Figure 8-20.”

Figure 8-20

Here is a video showing how to make a net.


Fish Traps

Another option, trapping, is fairly labor intensive as well.  Again, once it is made you can set it and check on it periodically.  Here is some information, also from the Army field manual on survival; FM 21-76.

“You may trap fish using several methods (Figure 8-21). Fish baskets are one method. You construct them by lashing several sticks together with vines into a funnel shape. You close the top, leaving a hole large enough for the fish to swim through.”


Figure 8-21
“You can also use traps to catch saltwater fish, as schools regularly approach the shore with the incoming tide and often move parallel to the shore. Pick a location at high tide and build the trap at low tide. On rocky shores, use natural rock pools. On coral islands, use natural pools on the surface of reefs by blocking the openings as the tide recedes. On sandy shores, use sandbars and the ditches they enclose. Build the trap as a low stone wall extending outward into the water and forming an angle with the shore.”

Here is a site that shows you how to make a fish trap, not quite step by step, but many more pictures than what the Army manual has.


Spearfishing

Also from the Army field manual on survival; FM 21-76.

“If you are near shallow water (about waist deep) where the fish are large and plentiful, you can spear them. To make a spear, cut a long, straight sapling (Figure 8-22). Sharpen the end to a point or attach a knife, jagged piece of bone, or sharpened metal. You can also make a spear by splitting the shaft a few inches down from the end and inserting a piece of wood to act as a spreader. You then sharpen the two separated halves to points. To spear fish, find an area where fish either gather or where there is a fish run. Place the spear point into the water and slowly move it toward the fish. Then, with a sudden push, impale the fish on the stream bottom. Do not try to lift the fish with the spear, as it with probably slip off and you will lose it; hold the spear with one hand and grab and hold the fish with the other. Do not throw the spear, especially if the point is a knife. You cannot afford to lose a knife in a survival situation. Be alert to the problems caused by light refraction when looking at objects in the water.”

There is a type of spear called a “frog gig” that I actually like better than the one described.  Below is a picture.  Clicking the picture will take you to a video that explains how to make it.

Frog Gig

Cooking Fish

Also from the Army field manual on survival; FM 21-76.

“You must know how to prepare fish and game for cooking and storage in a survival situation. Improper cleaning or storage can result in inedible fish or game.

Do not eat fish that appears spoiled. Cooking does not ensure that spoiled fish will be edible. Signs of spoilage are–

  • Sunken eyes.
  • Peculiar odor.
  • Suspicious color. (Gills should be red to pink. Scales should be a pronounced shade of gray, not faded.)
  • Dents stay in the fish’s flesh after pressing it with your thumb.
  • Slimy, rather than moist or wet body.
  • Sharp or peppery taste.

Eating spoiled or rotten fish may cause diarrhea, nausea, cramps, vomiting, itching, paralysis, or a metallic taste in the mouth. These symptoms appear suddenly, one to six hours after eating. Induce vomiting if symptoms appear.

Fish spoils quickly after death, especially on a hot day. Prepare fish for eating as soon as possible after catching it. Cut out the gills and large blood vessels that lie near the spine. Gut fish that is more than 10 centimeters long. Scale or skin the fish.

You can impale a whole fish on a stick and cook it over an open fire. However, boiling the fish with the skin on is the best way to get the most food value. The fats and oil are under the skin and, by boiling, you can save the juices for broth. You can use any of the methods used to cook plant food to cook fish. Pack fish into a ball of clay and bury it in the coals of a fire until the clay hardens. Break open the clay ball to get to the cooked fish. Fish is done when the meat flakes off. If you plan to keep the fish for later, smoke or fry it. To prepare fish for smoking, cut off the head and remove the backbone.”


Please click here to vote for Prepared Christian as a top Prepper site!

If you liked this article please think about sharing it on the social media listed below, thanks!
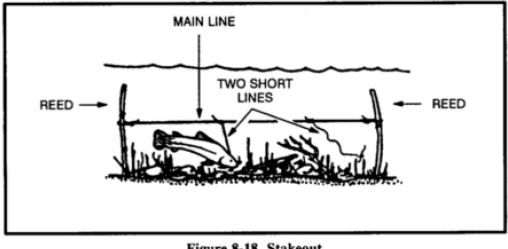
Preparedness Club