April 28, 2024

How to Grow Red Mustard in your Home Garden

How to Grow Red Mustard in your Home Garden

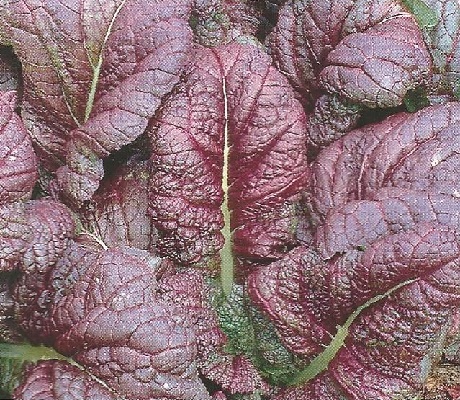
Mustard is a delicious leafy vegetable that is easy to grow. Mustard is also an excellent nutritional choice as it is a great source of vitamins and minerals your body needs. Mustard is cold tolerant, a prolific producer and when you grow one of the red varieties; it is aesthetically pleasing as well. That makes red mustard perfect for all you front yard gardeners.

The taste of mustard leaves, in my opinion, has a mild to slightly spicy flavor that is just as enjoyable raw as it is cooked or steamed. My personal favorite is to eat it raw mixed with other greens such as spinach, chard or lettuce. Here is a really good step by step red mustard recipe.
 
 
WHEN AND WHERE TO PLANT

You will want to select a sunny location and sow your seeds as soon as the ground can be worked when you are starting them in the spring. If red mustard is going to be part of your fall garden, you will want to plant your seeds 30 days out from your first frost. If you are closer to your frost than 30 days, be sure to start your mustard in a cold frame. Mustard is perfect for cold frame gardening.

For the best results for germination and plant growth, loosen your soil to help with aeration. This also makes it easier for your red mustard’s roots to grow and spread.
 
 
CARING FOR YOUR RED MUSTARD

Red mustard likes the soil to be moist at all times. A moderate watering every other day should suffice. You want to make sure you are not overwatering though. You do not want to saturate your soil. Be sure to keep the garden bed weed free and feed your mustard plants with a good organic fertilizer every couple of weeks.
 
 
HARVESTING

Red mustard (and other varieties of mustard) is a great vegetable to harvest. You can harvest mature leaves, leaving the rest of the plant alone to continue to produce. You can keep doing this so as long as the weather stays cool.

On a final note, as noted before, if your red mustard is going to be a part of your fall garden, be sure to use a cold frame once temperatures drop below freezing. This will help you extend your red mustard season through a good part of the winter.

Enjoy!
 
 
About the Author

mike_bio_picMike Podlesny is the author of the book Vegetable Gardening for the Average Person as well as the creator of the Seeds of the Month Club where members receive non gmo, heirloom variety seeds every month. You can listen to Mike each week on the Vegetable Gardening Podcast where he interviews gardening industry experts.


Please click here to vote for Prepared Christian as a top Prepper site!

If you liked this article please think about sharing it on the social media listed below, thanks!

Preparedness Club

3 Tips to Fix Blossom End Rot

Todays article is written by Mike the gardener from the Seed of the Month Club.
 
backet_of_veggies


Blossom end rot is one of the easier vegetable plant diseases to spot and the most asked about as well.  A few times each week someone will post a picture on our vegetable gardening Facebook page asking “Why are my tomatoes doing this?”


When your tomatoes have blossom end rot, they look great at the top, but on the bottom of the fruit, is a dark, mushy spot, that makes the tomato look inedible.  Blossom end rot typically looks like the picture below.  Along with tomatoes, blossom end rot also affects peppers, squash, cucumbers, and melons.

 
OLYMPUS DIGITAL CAMERA
 

THE CAUSE OF BLOSSOM END ROT

In short, blossom end rot occurs when your plant is not getting enough calcium.  However, it could be because your plants are not getting enough water either.   While your soil may have ample amounts of calcium in it for your plants, there still needs to be sufficient water in order for the plant to carry the calcium to where it needs to go.


Before you start heavy watering your plants though, it would be best to check the type of soil that you have and take a reading of your soil to see if it has the nutrients, in this case calcium and pH level that your plants need to avoid this disease.


Typically, soils that are acidic, sandy, or coarse often contain less calcium.  Also, overusing fertilizers can cause calcium deficiency as well.   Overusing fertilizers can increase your phosphorous levels which creates an environment where the calcium that is present is unusable by your plants.


FIXING BLOSSOM END ROT

Now that you know what blossom end rot looks like, what it is and what can cause it, the next logical step would be to understand how to fix this issue.  Your first step with blossom end rot, and just about any plant disease, is to mix in plenty of organic material, i.e., compost.  By mixing in plenty of compost, you are keeping your soil healthy and that creates a well suited environment for your plants.


The next step would be to check your soil’s pH level.  If your soil is too acidic you can add some lime to it to bring the pH level up.  The pH level of your soil will depend upon what you are growing, but you are shooting for 6.0 to 6.5 which is an ideal range for most plants in the home vegetable garden that are susceptible to blossom end rot.


Unfortunately, once your fruit has blossom end rot, that particular fruit cannot be reversed back to a healthy fruit.  Therefore you have to take steps to ensure that future fruit on that plant do not meet the same fate.  An immediate solution, so as to not lose your harvest for the season, is to use a liquid fertilizer that is enhanced with calcium.  There are plenty of organic options on the market.    Also, be sure to water daily so that your plants can actually move that calcium throughout the plant.


Again, blossom end rot cannot be reversed on particular fruits.  Once the fruit has it, it has it.  That does not make the fruit inedible though.  Just cut off the end that is dark and mushy.  To me, the fruit tastes the same.


mypicAbout the Author

Mike Podlesny is the author of the bookVegetable Gardening for the Average Person as well as the creator of theSeeds of the Month Club where members receive non gmo, heirloom variety seeds every month. You can listen to Mike each week on theVegetable Gardening Podcast where he interviews gardening industry experts.

The Seed of the Month Club

Seed of the Month Club

Now is the time of year to start thinking about the spring garden. Part of that process is ordering seeds. You may have noticed that one of my supporters is the Seed of the Month Club. I only accept advertisers that I think are high quality and can really benefit you, my readers. The Seed of the Month Club is among them!

Because it’s approaching the garden season, I thought I would tell you a little about the Seed of the Month Club, so you have some time to take advantage of it before you start your seeds.

I asked Mike the Gardener a few questions about the Seed of the Month Club and about gardening in general. Those questions and answers are below.
 

Chris: More and more people are taking up gardening for the first time. I can attest that there is a learning curve in gardening, so for beginners what is a good fruit or vegetable that is hard to screw up?

Mike: I always tell everyone, the first rule of thumb is to grow what you like to eat. It makes no sense in growing something that no one in your family will consume. When you grow something you are likely to eat, the chances of you taking care of it and seeing it through are far greater. With that said, there are a number of vegetables that I would consider very easy to grow, but the top of my list would be tomatoes.
You can grow just one plant and get plenty of fruit from them especially if you grow cherry or grape types.
 

Chris: How should seeds be stored?

Mike: To keep seeds for longer term storage, you want to make sure they are kept in a cool, not cold, dry location. This past gardening season I just germinated some onion seeds that were about 8 years old.

When they are stored correctly, you can get great germination rates from your seeds.
 

Chris: What is a good method to tell if you need to water?

Mike: What I would recommend to all gardeners is to keep track of the amount of water given to plants. I find that less water is better than a lot of water. You will want to keep track of the amount of rain you receive so that you know for sure your plants need water. Most vegetables can get away with just an inch or two of water per week.

However, let’s say you do not have a rain gauge, you can always refer back to the old “dirt” test. Plunge your finger into the soil about an inch or two and if the soil is dry and crumbly, chances are your plants need some water.
 

Chris: Can you list a few things that someone with limited space could grow?

Mike: This is a great question. It’s also open to a lot of possibilities as what or who defines “limited” space. Keeping in mind the answer to question number, my recommendation would be to grow prolific producers that can also be grown vertically. While you may be limited horizontally, when it comes to gardening, the sky really is the limit. I would recommend indeterminate tomatoes, again, cherry, grape as well as various other heirloom varieties, pole beans, indeterminate cucumbers such as Ashleys or Straight 8s. Peas are another good choice as well. My favorite are sugar snaps.

If someone is new to gardening I offer up 3 tips that are very useful to make sure new gardeners do not get frustrated. One, grow what you like eat. I touched on this earlier. Two, keep your garden small.
Gardening is work and the larger garden you have, the more work it can be. So if you are new to gardening, start small with just a few plants and grow each season from there. Three, keep your garden in sight.

Preferably right outside a window of your home in a room that you and your family frequent the most. I have found that people who are not constantly looking at their garden, tend to forget about it.
 

Chris: How many seeds can members expect to get per month? (A reader had this question months ago, so I asked Mike.)

Mike:
It varies based on seed variety, for example, squash seeds are larger so you can expect about 20 to 50 depending on which variety of squash … whereas tomato seeds are small so you can expect around 300 to 500 seeds in a packet.
 

Here is some info taken from the Seed of the Month FAQ.

How much is a membership?

In the United States
Six months $4.11
One Year $3.70
Two Years $3.33

International
Six months $5.11
One Year $4.60
Two Years $4.14

Your Membership Includes

• Open pollinated, heirloom varieties
• 8 packs of seeds your 1st month
• 4 packs of seeds every month thereafter
• 30 day money back guarantee
• 25% off vegetable gardening products in our online store
• Free shipping

When can I expect to receive my first mailing of seeds?

Your first shipment is sent out within 48 hours of you ordering. We ship via the United States Postal Service. The length of delivery time will be based on your location. You can expect your first shipment to arrive within 7 to 10 business days from the date you place your order.

When can I expect my monthly seeds to arrive?

Your first 8 packs of seeds are mailed right away. Then each month you will receive 4 packs of seeds by the last Friday of each month for the month in which they are due.

25% Discount

Just in case you missed it, Mike gives members a 25% discount on the Average Person Gardening Online Store. That is a 25% on vegetable, fruit and herb seeds, seed starting supplies and on soil testers. This would be a great way to save on seeds that you know you want to grow for sure this season.


My Take

I like that Mike only works with companies that give non-GMO, open pollenated, heirloom seeds. This way you can collect the seeds at the end of the season if you so choose.

As I stated in one of the questions to Mike, there is a learning curve to gardening. I think it is a skill every Prepper should practice, even if it’s only in a pot you place in the window. I agree with Mike, going vertical is a great way to mitigate limited space. Here is a trellis I made of PVC,. A version of this could be made for a large container.

If you haven’t ever looked at an heirloom seed catalog, you would be amazed at how many varieties of vegetables there are! I think this is a great way to get some seeds for a variety of vegetables you might not have known about previously.

I also think this would be a great way to build your own “Survival Seed Bank”. It’s cheaper than some of the commercial ones I have seen.

 
Please click here to vote for Prepared Christian as a top Prepper site!

If you liked this article please think about sharing it on the social media listed below, thanks!

PreparednessClubOne

Consolidated List of Gardening Posts

It’s that time of year when many of us are gardening by traditional, raised bed, square foot, container or other method. I’ve written a few articles over the years that might be new to some of you. I thought I would write one condensed post and link to them all.

For those of you who aren’t gardeners, this is a skill you should really consider learning. Have you ever heard the phrase, “society is nine meals away from anarchy”? It’s true! It only takes three hunger filled days for things to begin to fall apart. The easiest way to control a people, is to control their food supply. Throughout history, tyrants have controlled their people by limiting the food supply.

Victory gardens were a common thing during WWII. People raised some of their own food to help reduce the burden on the food supply brought on because of the war.

I have been at this a few years and still consider myself a novice, but I am happy to share with you what I have learned.

“Principles of Gardening” is a great place to start. This article covers some of the basics, but I also cover some things that people who’ve had a traditional garden all their lives might not know. For instance, did you know that tilling your garden plot is counterproductive and actually harmful to the soil?

Over the years I have collected several books on gardening. I shared them in (-“Gardening Resources” and have updated the list with three new books.

Few of us have perfect soil for gardening. “Soil Amendments to Improve Garden Growth” has multiple ways to improve soil.

One way to make the most of limited space it to use a trellis for plants that grow on a vine. We’ve come up with a PVC Trellis for melons and beans.

In “Natural Ways to Kill Bugs and Weeds”, I list several ways to kill bugs and weeds without using pesticides or herbicides.

In “Introduction to Permaculture; Building a Food Forest”, I explain the basics of permaculture, which is a design system that uses principles found in nature. Instead of a traditional farm that may produce one or two items, a permaculture design might have a hundred different items. Permaculture design is often referred to as a “food forest”.

If you liked this article please think about sharing it on the social media listed below, thanks!

PreparednessClubOne

Starting Seeds With a Soil Cubes and Building Rain Catchment

Here are a couple garden projects we’ve been working on this week. I know some of you are gardeners so I thought I would share them with you.

Soil Cubes

I know its past time to start seeds for many of you but we got a late start on it this year. Over the years I have used many things to start seeds, some worked better than others and some just plain didn’t work. This year I used something called a Soil Cube. While the seeds haven’t sprouted yet, I am pretty impressed. The soil cube is $19.99 +shipping, which gets you the soil cube maker and a tong to move the cubes with.

The problem I have had and seen with several seed starters is that the roots coil around the inside of a container, and are shocked when you transplant the seedling. The idea behind the Soil Cube is that your potting mix is the container. When the time is right you just put the cube in your garden. There is no root shock. Because the soil cube is the container, the roots stop at the edge of the soil, so there is no root coiling. We made fifty cubes in (maybe) thirty minutes and will transplant them to containers later this spring.

You can learn much more by visiting the Soil Cube Site I’ve also posted the intro video below.


Rain Catchment

Rain water is better for a garden than city water, so building a rain catchment system has been something on my to-do list for a while. I finally got to it this week. For every inch of rain that falls on a 1000 square foot roof, you can catch approximately 600 gallons of water. Believe it or not catching rain is actually illegal in some states, so check your local laws before building a rain catchment system.

We have two barrels that have holes on the left and right and screened tops. We also purchased a product called a Rain Reserve that you attach to a downspout. It diverts some of the rain water to your barrel. The Rain Reserves are pretty pricey now at $89. But you buy one and get one free. We paid half that at a farmers market a year or two ago.

As you can see from the pictures, we set one barrel up higher than the other. When that one is full, it will then transfer over to the second barrel through the hose. We put them on blocks to add some pressure if we decide to add drip irrigation later.

We’ll use the water for the garden but, if we needed to in a pinch, we could use it to flush the toilet, bathe or even drink. We would need to purify it first if we were going to drink it.

BeforeAfter

Rain Reserve

The top right picture shows that the Rain Reserve is pretty low. This is because that is where it was already cut, and I didn’t want to make another one if I could help it. It rained and it turns out I will need to make another cut and raise the rain reserve above the barrel.

If you liked this article please think about sharing it on the social media listed below, thanks!

PreparednessClubOne

Soil Amendments to Improve Garden Growth

There were a couple comments about poor soil types in the forum and I listed a couple things that could be done to improve soil types.  I thought I would give a few more ideas here for everyone to see.  I don’t personally like using fertilizers in most situations so with these tips you can improve most soil types naturally.

I am by no means a master gardener, but I have picked up a few things over the years.  I wrote an article last spring called Principles of Gardening.  In that article I covered some of the basics of gardening that I’ll not touch on here.


Raised Beds

If you have truly awful soil, you can build raised beds and bring in soil.  By managing the soil in the raised bed, you will, over time, improve the soil below the bed.  I like raised beds for many reasons.  You can read more about it in a review I did of Mel Bartholomew’s book All New Square Foot Gardening.


Organic Matter

Whether you have too much clay or too much sand in your soil, you can improve it by adding organic matter.  There are a few ways to do this that I’ll list below.


Composting

The following is from the article I wrote on Principles of Gardening.

Composting is more than just throwing out kitchen scraps, but that is part of it. Making your own compost and adding it to your beds is a great way to amend the soil and get rid of kitchen scraps as well as leaves and grass clippings. Here is a site with a huge amount of Information on composting. One of the mistakes I made was buying one large bin and continually adding to it. I have heard Jack Spirko from the Survival Podcast say, “That is like adding more cake mix, when the cake is already half baked in the oven.” He recommends using three small compost bins and cycling them, so you fill one, leave it alone and start filling the second and so on.

There are often community compost sites.  Many times you must pay to deposit leaves, grass or other compostable materials.  However, you can, in many cases, take composted material for free.  You just have to shovel it yourself.  These sites may use chemicals to speed the process of composting, so if you want to remain natural, you should check with the facility.

Manure can be a great source of nutrients to add to your compost.  I was able to find plenty for free on Craig’s list.


Mulching

Mulching is taking organic matter and placing it over the soil.  This will do multiple things; it will bring in other nutrients, it will keep the soil moist and it will prevent evaporation among other things.  You can use many things for mulching: leaves, grass clippings, shredded newspaper and even wood chips.  Carmen commented in the Principles of Gardening about a video done by a Christian called Back To Eden.  It’s about a man who says God showed him how to use wood chips for mulch.  If you leave them on the topsoil this will work great, but do not mix them in with the soil.


Cover Crops

Here is a great article called Cover Crop Basics, written by Organic Gardening, a great publication that we have received for some time.  The article is well worth reading, so I will just touch on the highlights.

Cover crops can help bring organic material to your soil.  They are also a great way to stop erosion.  The process is fairly straight forward.  You plant a crop, give it minimal care and then either chop the top off, letting the plant regrow to chop the top off again later (this process is often called “chop and drop”) or you kill the cover crop completely.  In either case the organic material is left to return its nutrients back to the soil.

There are many types of things you can use as cover crops; ryegrass, barely, buckwheat and legumes, to name a few.  The benefit of using legumes is that they bring nitrogen into the soil, which is often deficient in poor soil types.   You can also use a mix of ryegrass and legumes, to get the benefit of both.


Final Thoughts

These methods will fix a lot of problems with your soil, such as; adding nutrients, stopping erosion and adding organic matter.  While these things can be used to improve poor soil quality, you can keep doing them to keep improving the quality.


If you liked this article please think about sharing it on the social media listed below, thanks!

Gorilla Gardening

There are two types of gorilla gardening.  One type is where people plant flowers in public places to make things pretty.  The other type is the one I want to talk about today; ways to plant edibles or improve their condition.  By “improving their condition”, I mean making it easier for them to retain moisture, maybe thinning the area out to elevate competition for resources.


Introducing New Species

One option is to plant new species of plants in various areas.  A great way to do this is something I may have heard on The Survival Podcast.  You take the seeds for the plants you want to introduce and put them in a clay ball and let it dry.  When you go on a walk, you simply throw these clay balls in areas you think they would be well suited.  Now you just wait for rain.  When it rains, this will dissolve the clay and give the seeds an added boost of nutrients from it.

Native Americans used to plant three plants together that benefited each other.  They have been dubbed the three sisters.  The three plants are corn, pole beans and squash.  The corn grows tall, the pole beans will climb up the corn as they grow and will also bring nitrogen to the soil for the other two plants.  The squash will help protect the soil around the area, the leaves keeping the soil moist and blocking out sun, which can limit weed growth and help limit evaporation.


Some Things to Keep in Mind

When you gorilla garden you have limited control over what happens.  Someone else could come along and destroy or harvest what you have planted and wildlife can also help themselves.

Because of this you’ll want to plant in places that are off the beaten path but are easy enough for you to get to from time to time.  Keeping a journal of what was planted and where you planted it is a good idea.

I would not plant a gorilla garden and depend on its produce to sustain you and your family.  I would take the approach that anything you may harvest from gorilla gardening is an added bonus.

Gorilla gardening could also be used to draw game into the area throughout the year.


Enhancing the Wild

Another type of gorilla gardening is simply enhancing what is already in place.  For example, let’s say you’re on a hike and spot some wild blueberries.  If the area is over crowded with them, you may remove a few bushes to give the others less competition for nutrients.  If you see the path rain takes, you may create a little swale to slow the water down and retain more in the area.

Another option is to take leaves from the area and use them as mulch covering the bottom of the berry patch.  You could also plant things that would help bring in nutrients to the area.  For instance, beans tend to bring in nitrogen.  Planting them near an area and then cutting them once they get to a certain height, leaving them to decompose; called “chop and drop”, returns nitrogen to the soil.

Again, with the wild edibles, I would make note of where you found them and look at anything you harvest from them as a bonus.


Do you have any ideas for a gorilla garden?

Preparedness Tip: Church Sponsored Gardening

There is a trend now where some businesses are letting their employees have a small garden on their property.  I had an idea a year or so ago that I think might fit nicely for some churches.

Many churches have land that is unused.  I know of two near me that have HUGE plots that sit unused. Some might be willing to start a community garden and rent space. Local lumber yards might donate some lumbar and write it off as a deduction.  Local garden centers might be willing to donate some soil too.  A compost center could be established and acceptable kitchen waste could be dumped here.

If they built ten 4×4 beds and paid for the lumber, they could get congregants to put them together and fill them with soil.  They could rent the 4×4 bed for say $25 for the season, that’s only $250, but if that money was used the following year to increase the amount of beds, the income would build over time.

Depending on local laws, they could also start a farmer’s market and rent space.  Growers from the boxes could buy a stall and sell any excess produce (not likely from one 4×4 box, but you get the idea).

This would be a great way to build community and I have heard it said that gardening is the gateway drug to preparedness.


Introduction to Permaculture; Building a Food Forest

Permaculture is something that I have mentioned a few times, but it’s not something I have discussed in any detail. I’m still a Permaculture novice, but thought I would share some of what I have learned as well as some resources. I think Permaculture can be useful for anyone designing food production systems, whether that is a small suburban yard or a multi-acre farm.

This is an immense topic, so in this article I am only going to introduce you to what Permaculture is and give you some resources to further explore the subject.


What is Permaculture?
Permaculture is a design system that takes principles found in nature and works with them. For example, instead of planting an acre of corn (mono-culture) you might plant 100 different species, scattered throughout the acre. Instead of things being planted in rows, the only structure might be zones and layers, which are how they grow naturally. A Permaculture system would more resemble a forest than the traditional farm. In fact, a Permaculture design is often referred to as a “food forest”.


Why Use Permaculture?
Why use Permaculture instead of traditional farming or gardening? Bill Mollison answers this very well:

“The aim is to create systems that are ecologically-sound and economically viable, which provide for their own needs, do not exploit or pollute, and are therefore sustainable in the long term. Permaculture uses the inherent qualities of plants and animals combined with the natural characteristics of landscapes and structures to produce a life-supporting system for city and country, using the smallest practical area.”


Who Developed Permaculture?
Permaculture, as a design system, was developed by Bill Mollison and David Holmgren in the 1970’s and introduced in their book “Permaculture One” in 1978. Permaculture is a term coined by Bill Mollison. It was originally derived from “Permanent Agriculture” and later “Permanent Culture”. Since these same practices are visible by watching nature, others have developed similar concepts, under different names.


Zones

Zones in Permaculture are used to organize things by their frequency of human intervention.

Zone 0
This is your home.

Zone 1
This is the area closest to your home. These would be the things that need the most attention; being watered and mulched the most. Things here would be your herb garden, raised beds and compost pile. This could also contain a greenhouse.

Zone 2
This is the area for perennials and any orchard trees. You might still mulch and irrigate, but less than in zone 1.

Zone 3
This is for conventional farming crops

Zone 4
This is a semi-wild area. You might forage here but there is minimal human intervention.

Zone 5
This is wilderness with no human intervention.


Layers

Planting in layers is how permaculture gets its structure and should be used when planning your landscaping; planting the tallest things the furthest away, so that all layers get as much sun as possible.

Layer 1
The canopy; the tallest trees.

Layer 2
Sub-canopy layer. This contains shorter trees, such as dwarf fruit trees.

Layer 3
Shrubs and bushes belong in layer three.

Layer 4
Herbaceous layer, plants such as Daylily’s and Hosta’s.

Layer 5
Rhizosphere layer, for roots and tubers.

Layer 6
Soil surface, consisting of cover crops like bush green beans, strawberries, any low growing plant that can add nutrients and limit erosion.

Layer 7
Vertical climbers, vines that climb like pole green beans.


Swales
A swale is a shallow ditch used to trap water that would normally run off the surface of land. It captures it and forces it to slowly go through and hydrate the soil.


Hugelkultur
The last thing I want to cover is something that isn’t necessarily a part of permaculture, but something that could be used in a permaculture design.

raised garden beds: hugelkultur instead of irrigation covers Hugelkultur in much greater detail, but I’ll give a quick and dirty explanation. Hugelkultur is simply burying wood with soil, compost, manure and planting on top of it. In the first year, you may have to water as you normally would, but here’s the reason people practice Hugelkultur; as that wood breaks down it acts as a sponge and holds moisture, releasing it to the vegetation that you have planted.


Permaculture Resources

I first learned of Permaculture from Jack Spirko on the Survival Podcast. Jack has done a huge amount of content dedicated to permaculture, some of it in hour long shows. Some of the information is also answering a listener’s question, so that show might only have 5-10 minutes on the topic. I searched his site using the word permaculture, here are all of the results.

Permies.com
This is one of the biggest, if not the biggest, permaculture forums on the Internet. There is a huge amount of information here on all things permaculture.

The Permaculture research Institute of the USA
Here is a link that has a lot of information on permaculture, including classes, DVD’s and other information, including a forum, on permaculture.

 
Please click here to vote for Prepared Christian as a top Prepper site!

If you liked this article please think about sharing it on the social media listed below, thanks!

Preparedness Club

Natural Ways to Kill Bugs and Weeds

Natural ways to kill bugs and weeds

Many of us are trying to grow gardens naturally, without herbicides and pesticides. This leaves us with the challenge of taking care of weeds and pests. Here are some natural things you can do to get rid of both. (I didn’t use the word organic, because the word can mean different things to different people.)
 
 
Stop Weeds Before They Start

By using a heavy layer of mulch, you can often prevent weeds from starting in the first place. When I was a kid, we used newspaper and black plastic. The newspaper works but often blows away. The black plastic works if you weigh it down with rocks. That is, until a hole is made, then weeds pop up through the hole. A reader shared a website called Back To Eden. This man uses wood chips for mulch and has great success. There is a video in which he describes how God revealed this method of gardening to him, which is how things are naturally and were in the Garden of Eden. The video is 90 minutes long, but worth watching.
 
 
Options for Killing Weeds

If you only have one or two weeds, pulling them from the root should take care of it, then just add it to the top of the mulch pile or toss it in the garbage.

You can pour boiling water on them as close to the root as you can. I have done this with some success on weeds that were growing on the outside of the raised beds. It’s hard to judge how much water you should pour, so I probably poured more than I needed to, but I wanted them dead.

The USDA Agricultural Research Service Scientists have proven that household vinegar mixed with water can kill weeds. Mix the two in a spray bottle and coat the leaves of a weed. Use caution as it will kill plants as well.

Coat weeds with soapy water; mix 5-6 tablespoons of dish soap with a quart of water. Spray the weeds thoroughly and yes, you guessed it be careful not to get any on your plants.

Insects can do an amazing amount of damage quickly, so it’s important to be paying attention to your plants. If you see an insect and you’re not sure what it is, identify it first to make sure you’re not killing a beneficial insect. Below are a few different methods for dealing with unwanted insects.
 
 
Hot Sauce

This is an idea I heard Jack Spirko from The Survival Podcast talk about. It’s been a while, but I think he said to get the hottest pepper you can from the grocery store, chop it up into small bits, add it to a spray bottle and add water. Let it sit overnight. In the morning, go out to your garden and look for the culprit. Spray a little firewater on him and his friends. Jack said this shouldn’t harm the plant in any way, but said to use it sparingly and avoid spraying the beneficial insects in your garden.
 
 
Create Habitat for Beneficial’s

Once you have identified a bug, instead of treating every bug as you see them, you can attract its natural predator. This could mean planting some flowers or plants that you might not normally grow. Here is a page that has information on using beneficial bugs as natural pest control.

You could also build habitat for insect eating birds. This, however, is a little more involved than just plating a few flowers.

Birds need a place nearby where they can perch and scan the garden for predators. Whether it’s a bird house or just a fashioned perch near the garden, either should be fine.

Birds are attracted to moving water. If you already have a birdbath, you could add a bubbler for $30-$40. If you don’t have a birdbath, you could look at a fountain instead. It doesn’t need to be huge or elaborate.

You could also add a bird feeder to sweeten the deal, and target the kind of bird you want in the garden, by using feed they love.

There are websites you can buy beneficial insects from, but if you don’t have the habitat for them, they won’t stay around for long.

I also listed several gardening resources that list some of the books I have on dealing with weeds and unwanted insects naturally.

Do you have any natural ways of dealing with pests or weeds?

 
Please click here to vote for Prepared Christian as a top Prepper site!

If you liked this article please think about sharing it on the social media listed below, thanks!

Preparedness Club