May 18, 2024

Introduction to Permaculture; Building a Food Forest

Permaculture is something that I have mentioned a few times, but it’s not something I have discussed in any detail. I’m still a Permaculture novice, but thought I would share some of what I have learned as well as some resources. I think Permaculture can be useful for anyone designing food production systems, whether that is a small suburban yard or a multi-acre farm.

This is an immense topic, so in this article I am only going to introduce you to what Permaculture is and give you some resources to further explore the subject.


What is Permaculture?
Permaculture is a design system that takes principles found in nature and works with them. For example, instead of planting an acre of corn (mono-culture) you might plant 100 different species, scattered throughout the acre. Instead of things being planted in rows, the only structure might be zones and layers, which are how they grow naturally. A Permaculture system would more resemble a forest than the traditional farm. In fact, a Permaculture design is often referred to as a “food forest”.


Why Use Permaculture?
Why use Permaculture instead of traditional farming or gardening? Bill Mollison answers this very well:

“The aim is to create systems that are ecologically-sound and economically viable, which provide for their own needs, do not exploit or pollute, and are therefore sustainable in the long term. Permaculture uses the inherent qualities of plants and animals combined with the natural characteristics of landscapes and structures to produce a life-supporting system for city and country, using the smallest practical area.”


Who Developed Permaculture?
Permaculture, as a design system, was developed by Bill Mollison and David Holmgren in the 1970’s and introduced in their book “Permaculture One” in 1978. Permaculture is a term coined by Bill Mollison. It was originally derived from “Permanent Agriculture” and later “Permanent Culture”. Since these same practices are visible by watching nature, others have developed similar concepts, under different names.


Zones

Zones in Permaculture are used to organize things by their frequency of human intervention.

Zone 0
This is your home.

Zone 1
This is the area closest to your home. These would be the things that need the most attention; being watered and mulched the most. Things here would be your herb garden, raised beds and compost pile. This could also contain a greenhouse.

Zone 2
This is the area for perennials and any orchard trees. You might still mulch and irrigate, but less than in zone 1.

Zone 3
This is for conventional farming crops

Zone 4
This is a semi-wild area. You might forage here but there is minimal human intervention.

Zone 5
This is wilderness with no human intervention.


Layers

Planting in layers is how permaculture gets its structure and should be used when planning your landscaping; planting the tallest things the furthest away, so that all layers get as much sun as possible.

Layer 1
The canopy; the tallest trees.

Layer 2
Sub-canopy layer. This contains shorter trees, such as dwarf fruit trees.

Layer 3
Shrubs and bushes belong in layer three.

Layer 4
Herbaceous layer, plants such as Daylily’s and Hosta’s.

Layer 5
Rhizosphere layer, for roots and tubers.

Layer 6
Soil surface, consisting of cover crops like bush green beans, strawberries, any low growing plant that can add nutrients and limit erosion.

Layer 7
Vertical climbers, vines that climb like pole green beans.


Swales
A swale is a shallow ditch used to trap water that would normally run off the surface of land. It captures it and forces it to slowly go through and hydrate the soil.


Hugelkultur
The last thing I want to cover is something that isn’t necessarily a part of permaculture, but something that could be used in a permaculture design.

raised garden beds: hugelkultur instead of irrigation covers Hugelkultur in much greater detail, but I’ll give a quick and dirty explanation. Hugelkultur is simply burying wood with soil, compost, manure and planting on top of it. In the first year, you may have to water as you normally would, but here’s the reason people practice Hugelkultur; as that wood breaks down it acts as a sponge and holds moisture, releasing it to the vegetation that you have planted.


Permaculture Resources

I first learned of Permaculture from Jack Spirko on the Survival Podcast. Jack has done a huge amount of content dedicated to permaculture, some of it in hour long shows. Some of the information is also answering a listener’s question, so that show might only have 5-10 minutes on the topic. I searched his site using the word permaculture, here are all of the results.

Permies.com
This is one of the biggest, if not the biggest, permaculture forums on the Internet. There is a huge amount of information here on all things permaculture.

The Permaculture research Institute of the USA
Here is a link that has a lot of information on permaculture, including classes, DVD’s and other information, including a forum, on permaculture.

 
Please click here to vote for Prepared Christian as a top Prepper site!

If you liked this article please think about sharing it on the social media listed below, thanks!

Preparedness Club

Gardening Resources

Today I thought that I would list some of the gardening resources I have used. I’m sure some of you have others, please add them in the comments and I’ll add them to the list. All descriptions are taken from the site that I am linking to.

Sites to order seeds.

Seed Savers Exchange
“Seed Savers Exchange is a non-profit organization dedicated to saving and sharing heirloom seeds. Since 1975, our members have been passing on our garden heritage by collecting and distributing thousands of samples of rare garden seeds to other gardeners”

Seeds of Change
“In 1989, Seeds of Change began with a simple mission: to preserve biodiversity and promote sustainable, organic agriculture. By cultivating and sharing an extensive range of organically grown vegetable, flower, herb and cover crop seeds, we have honored that mission for almost 25 years.”

Baker Creek Heirloom Seeds
“Located in South Western Pennsylvania, we are a small, family run seed house that has been in the mail order business since 1988. When we started this business, our first priority was to offer old fashioned vegetables noted for their taste. All of the varieties we offer are open pollinated (non hybrid) and have been grown by generations of backyard gardeners. ”


Magazine


Organic Gardening Magazine
All descriptions are taken from the site that I am linking to.
 
Books
 book descriptions taken from Amazon

Organic Gardening (Botanica’s Pocket)
Ranging from A to Z, Botanica’s pocket series presents more than 2,000 plant descriptions, each accompanied by brilliant color photographs. Every description includes tips on care and location, information on origins, planting and blooming times, forms of growth, frost hardiness and suggestions for beautiful arrangements. A treasure chest for every gardener and nature lover: for browsing, learning, seeking and finding.


The Organic Gardener’s Handbook of Natural Insect and Disease Control: A Complete Problem-Solving Guide to Keeping Your Garden and Yard Healthy Without Chemicals
End your worries about garden problems with safe, effective solutions from The Organic Gardener’s Handbook of Natural Insect and Disease Control!
* Easy-to-use problem-solving encyclopedia covers more than 200 vegetables, fruits, herbs, flowers, trees, and shrubs
* Complete directions on how, when, and where to use preventive methods, insect traps and barriers, biocontrols, homemade remedies, botanical insecticides, and more
* More than 350 color photos for quick identification of insect pests, beneficial insects, and plant diseases.


Seed to Seed: Seed Saving and Growing Techniques for Vegetable Gardeners, 2nd Edition
Seed to Seed is a complete seed-saving guide that describes specific techniques for saving the seeds of 160 different vegetables. This book contains detailed information about each vegetable, including its botanical classification, flower structure and means of pollination, required population size, isolation distance, techniques for caging or hand-pollination, and also the proper methods for harvesting, drying, cleaning, and storing the seeds.


Rodale’s Ultimate Encyclopedia of Organic Gardening: The Indispensable Green Resource for Every Gardener
Rodale’s Ultimate Encyclopedia of Organic Gardening has been the go-to resource for gardeners for more than 50 years—and the best tool novices can buy to start applying organic methods to their fruit and vegetable crops, herbs, trees and shrubs, perennials, annuals, and lawns. This thoroughly revised and updated version highlights new organic pest controls, new fertilizer products, improved gardening techniques, the latest organic soil practices, and new trends in garden design.


Insect, Disease & Weed I.D. Guide: Find-It-Fast Organic Solutions for Your Garden (Rodale Organic Gardening Book)
What is it? Why is it in your garden? How can you make it go away? Or should you try to keep it there? Use this book to know what’s what in your garden, lawn, and landscape. Uncover the identity of each garden mystery you meet, them learn exactly what– if anything– to do about it. From banishing pests and diseases to wiping out weeds to creating a haven for garden good guys, you’ll find safe, sensible, all-organic recommendations to help you make the best choices for our garden.


All New Square Foot Gardening, Second Edition: The Revolutionary Way to Grow More In Less Space
“Bartholomew, author of the popular Square Foot Gardening (1981), has refined his original square-foot gardening concept by adding ten improvements, including a new location for the garden that is closer to the house, a special soil mix, and six-inch deep, 4′ x 4′ above-ground boxes with grids. His techniques do not require heavy digging or fertilizers and feature advice on using vertical gardening to save space. He clearly explains the square-foot concept, from the rationale behind it (the square-foot garden takes up much less space than traditional row gardening and saves time, money, and aggravation) to how to plan the garden, build the boxes and vertical supports, and employ his planting and cultural techniques. There are also helpful charts for succession planting and spacing plants and a schedule for starting seeds indoors. Despite its somewhat annoying tendency to read like an infomercial, this attractive, easy-to-understand, and well-organized book for both novice and experienced gardeners is recommended for all libraries.” — Library Journal


The Vegetable Gardener’s Bible (10th Anniversary Edition)
The invaluable resource for home food gardeners! Ed Smith’s W-O-R-D system has helped countless gardeners grow an abundance of vegetables and herbs. And those tomatoes and zucchini and basil and cucumbers have nourished countless families, neighbors, and friends with delicious, fresh produce. The Vegetable Gardener’s Bible is essential reading for locavores in every corner of North America!

Everything you loved about the first edition of The Vegetable Gardener’s Bible is still here: friendly, accessible language; full-color photography; comprehensive vegetable specific information in the A-to-Z section; ahead-of-its-time commitment to organic methods; and much more.


The Heirloom Life Gardener: The Baker Creek Way of Growing Your Own Food Easily and Naturally
Tired of genetically modified food every day, Americans are moving more toward eating natural, locally grown food that is free of pesticides and preservatives—and there is no better way to ensure this than to grow it yourself. Anyone can start a garden, whether in a backyard or on a city rooftop; but what they need to truly succeed is The Heirloom Life Gardener, a comprehensive guide to cultivating heirloom vegetables.

In this invaluable resource, Jere and Emilee Gettle, cofounders of the Baker Creek Heirloom Seed Company, offer a wealth of knowledge to every kind of gardener—experienced pros and novices alike. In his friendly voice, complemented by gorgeous photographs, Jere gives planting, growing, harvesting, and seed saving tips. In addition, an extensive A to Z Growing Guide includes amazing heirloom varieties that many people have never even seen. From seed collecting to the history of seed varieties and name origins, Jere takes you far beyond the heirloom tomato. This is the first book of its kind that is not only a guide to growing beautiful and delicious vegetables, but also a way to join the movement of people who long for real food and a truer way of living.
 

Earth User’s Guide to Permaculture, 2nd Edition
The principle for permaculture is simple: provide back to the earth what we take from it to create a sustainable environment. The three principle aims are: Care for people; Care for the earth; and Redistributing everything surplus to one’s needs.

This completely revised and updated edition of Rosemary Morrow’s highly successful Earth User’s Guide to Permaculture is a straight-forward manual of practical permaculture. Fundamentally, permaculture is design science and in this new edition design is emphasised. This book will be most beneficial if you apply it to the space where you live and work. The same principles apply for becoming more sustainable and living lightly whether you live in a small city apartment with a balcony, in a house with a garden in the suburbs, or on acreage in the country.

Included in this new edition are chapters on seed-saving, permaculture at work, integrated pest management, information about domestic as well as rural water usage, a non-destructive approach towards dealing with weeds and wildlife, and designing to withstand a disaster.
Earth User’s Guide to Permaculture is suitable for beginners as well as experienced permaculture practitioners looking for new ideas in moving towards greater self-reliance and sustainable living.

 
Please click here to vote for Prepared Christian as a top Prepper site!

If you liked this article please think about sharing it on the social media listed below, thanks!

Preparedness Club

Building a Garden Trellis with PVC

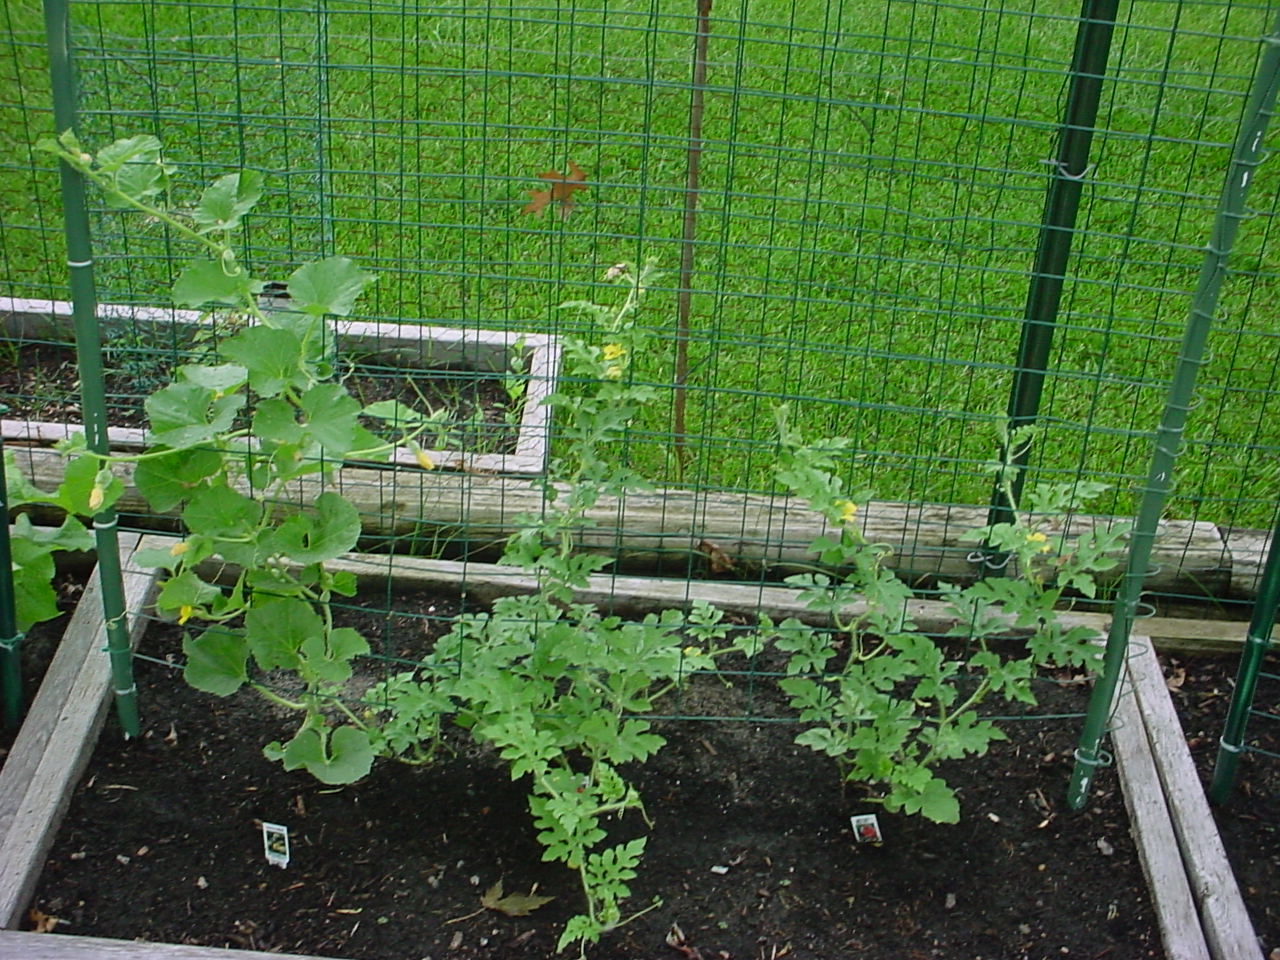
In both raised bed and square foot gardening, trellises are used to grow vertical instead of horizontal. This provides for maximum growing space in the smallest footprint.

The All New Square Foot Gardening, Second Edition book lists rebar, electrical conduit and trellis netting, for the supplies to make a trellis. I looked at that option and didn’t care for the trellis netting so I came up with what I think is a better solution.

It includes green vinyl coated garden fence, ½ inch PVC, some PVC elbows, a few long threaded rods, zip ties and green spray paint. For tools you’ll need a hack saw to cut the threaded rods, a hack saw or PVC Pipe Cutter to cut the PVC, a hammer to pound the threaded rods and a wire snips to trim the zip ties.

I wish I could give you a video or step by step pictures, but the only ones I have are with the trellises completely done and in place. If this article doesn’t make sense I’ll make a video this spring.

  1. Measure the length of the box and cut a piece of PVC to that length as well as two vertical pieces the same length as each other, I made them around four feet.
  2.  Put the three pieces together with two PVC elbows.
  3. Unroll the green fencing and cut a length the same length and width as your PVC frame. You’ll want it off the soil, but only a couple of inches. Lay the PVC over the frame and attached it with some zip ties, every foot or so.
  4. Cut the threaded rod into two 4 foot sections and placed them in the ground, the width of the PVC frame apart from each other. Pound each piece two feet deep and slide the PVC over the threaded rods. Voila, trellis!

We left the PVC white the first year and it was UGLY. We took them to the garage and spray painted them with some green outdoor spray paint at the beginning of our second year.

(click the picture to get a better view)


After harvest, just pull the vegetation from the trellis and throw it in the composter. Put the trellis in the shed for next year.

We used the same green vinyl coated fencing with garden zone utility fencing to surround our garden. The young rabbits were still able to fit through, so we added chicken wire to the bottom two feet. This completely stopped them.

I made a PVC square the size of the entry for a “gate”. I used PVC elbows on the top and PVC “T’s” on the bottom. I used a 3’ section of threaded rod on one side and a 1’ section of threaded rod on the other. We used the longer side as the stationary side, lifting the smaller side off the threaded rod to pivot the “gate” open.

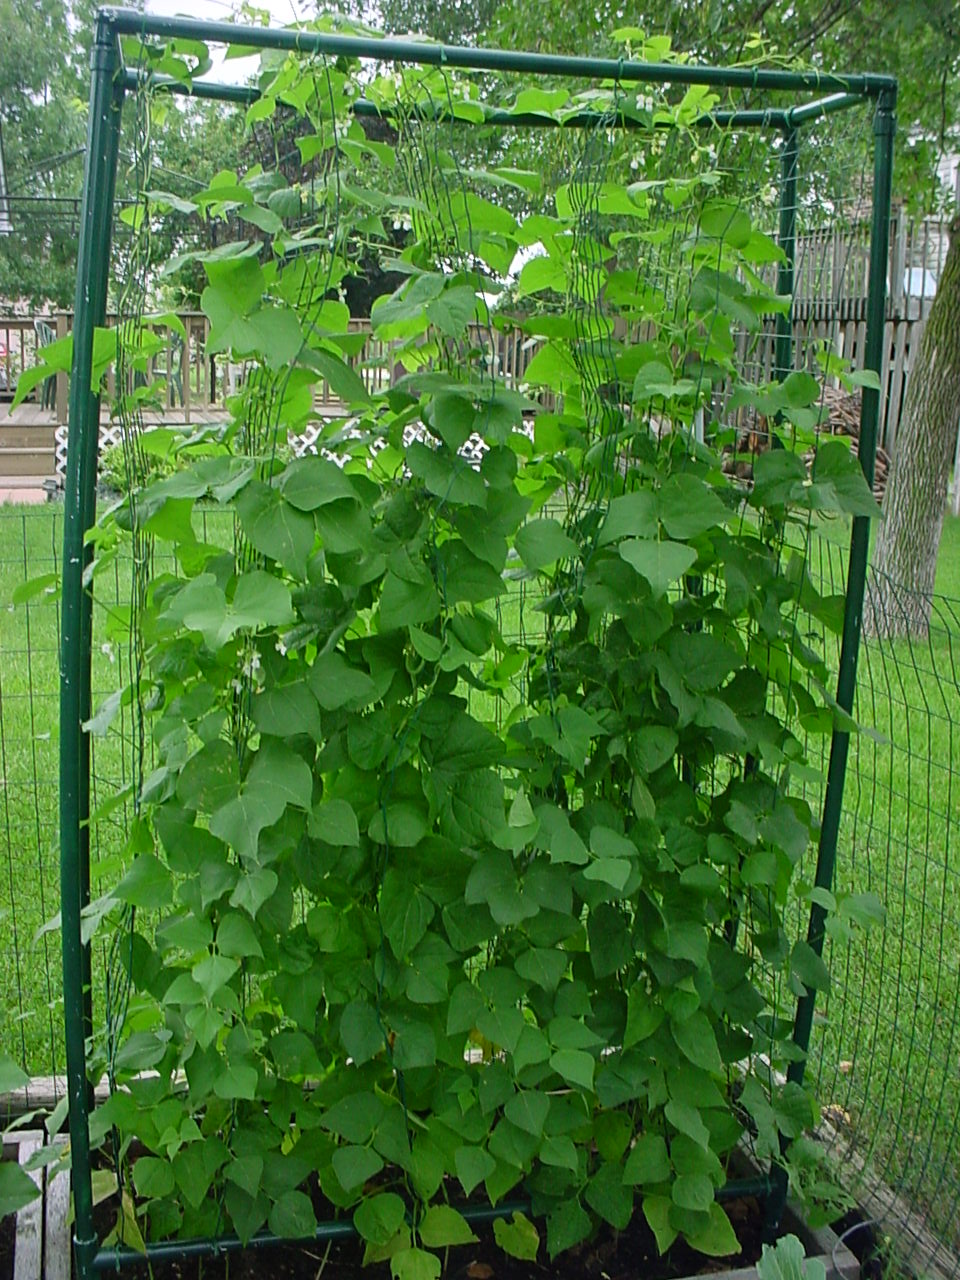
Here is a trellis I came up with for pole green beans, its six feet tall, but they would have kept going. I put the trellises this direction to make it easier to reach the beans, as it’s in the corner of the garden with fence on two sides. I also didn’t put them in very tight, this way I could slide them side to side a little to make more room.

 
Please click here to vote for Prepared Christian as a top Prepper site!

If you liked this article please think about sharing it on the social media listed below, thanks!

Preparedness Club

Principles of Gardening

It’s that time of year (at least in Minnesota) to be ordering seeds for planning this year’s garden. I think that gardening is a skillset that more people should have, but there is a learning curve. It’s more than just throwing a seed in the dirt and picking the produce. If you’re looking to make the leap from just prepping to homesteading, gardening is the perfect transition. Plus, with the ever growing cost of groceries, a garden is one way to reduce the cost of food.

We tried for a few years, but there is just too much shade in our yard for a garden, so we won’t be planting one this year. I’m by no means a master gardener, but I thought I would share some of the things I have learned along the way.

This article is geared more toward the beginner gardener, but if you pros have anything to offer, please do so in the comment section.
 
 
Heirloom vs. Hybrid

Hybrid vegetables are the result of cross-pollination of two compatible plant types. This is done to take advantage of the features of both plants, to increase yield, disease resistance, cold tolerance etc. Hybrid seeds are sterile, so you would have to purchase new seeds each season. Hybrid seeds are not GMO (Genetically Modified Organism), which are seeds that have had DNA of plants, animals or microorganisms spliced into the DNA of the plant. Heirloom plants are grown from heirloom seeds which are harvested from the heirloom plant at the end of the growing season. For more information, here is another article on Heirloom and Hybrid seeds.
 
 
Zone Hardiness Map

Before you decide on what kind of vegetables to grow, take a look at the USDA Plant Hardiness Zone Map.. Chances are that your local store will only have the seeds or plants that are hardy for your zone, but better safe than sorry.
 
 
Starting Seeds or Buying Plants

For beginner gardeners it is probably easier to purchase plants from a greenhouse that you trust. However, I think that starting seedlings is a skill set that every gardener should have. If you plan to start them from seed, the Soil Cube is something you might want to invest in. It is much better than the seedling pods that I have used in the past.
 
 
Traditional vs. Square Foot vs. Raised Bed

Traditional gardening is what most people think of; tilled soil and things planted in rows. This is the kind of gardening my parents did when I was a kid. Square Foot gardening plants things more densely and makes use of trellises to grow up, instead of spread out. Mel Bartholomew’s All New Square Foot Gardening, Second Edition is a great book on the subject and I’ll be reviewing it on Thursday. Raised bed gardening uses the same style beds as square foot gardening, but there are no 1’x1′ sectioned off squares.

The benefit of using a raised bed is that if the soil in your yard isn’t the best for gardening, you can bring soil in as well as compost and other amendments. Also the use of a trellis lets you grow a lot more in a smaller area.
 
 
To Till or Not to Till

As I mentioned, when I was a kid, my parents had a traditional garden. Every spring we would get the tiller out and till the soil before we planted. In my research on gardening I have found that tilling destroys the eco-system below the surface, which is made up of organic matter, fungi, worms, water and microorganisms.
 
 
Mulch

Mulch does a lot for a garden. It helps keep the soil moist, protects against weeds and many other things. There are organic things like straw, leaves, grass clippings, compost and others, as well as inorganic such as black plastic. This article from HGTV gives you some Mulching No-Nos.
 
 
Composting

Composting is more than just throwing out kitchen scraps, but that is part of it. Making your own compost and adding it to your beds is a great way to amend the soil, get rid of kitchen scraps as well as leaves and grass clippings. Here is a site with a huge amount of Information on composting.. One of the mistakes I made was buying one large bin and continually adding to it. I have heard Jack Spirko from the Survival Podcast say, “That is like adding more cake mix, when the cake is already half baked in the oven.” He recommends using three small compost bins and cycling them, so you fill one, leave it alone and start filling the second and so on.

There are often community compost sites, many of which add chemicals to make the materials compost faster. If you want to avoid adding chemicals, you should be able to ask at the site.
 
 
Herbicides and Pesticides

I don’t care for either, because if it’s in the soil, it’s probably in the plant and then probably going to be eaten. There are organic ways of dealing with weeds and pests. One of the books I have on the subject is The Organic Gardener’s Handbook of Natural Insect and Disease Control: A Complete Problem-Solving Guide to Keeping Your Garden and Yard Healthy Without Chemicals.

If you have any tips to shorten the learning curve, please share them in the comment section.

 
Please click here to vote for Prepared Christian as a top Prepper site!

If you liked this article please think about sharing it on the social media listed below, thanks!

Preparedness Club

Food Shortages and Rising Food Prices

I want to cover the various reasons we prepare. I originally thought I would just knock them all out back-to-back, but the Lord showed me that small spoonfuls, spread out, is a better way to approach this. With that in mind, some of the topics I will write on can be dark and may cause fear. Please remember that fear is an emotion given by God to get us to take action and to help us avoid danger. We can’t be prudent if we don’t know what the danger is. In other words, we don’t stand in fear but we do use it to motivate us.

First in the category that I’m going to call “Signs of the Times” is about Food; what, if any, impact will shortages and rising prices have globally and what might we expect here in America.

Many of you will remember hearing about the food shortages and riots in 2008. For those unaware, doing a Google search for “2008 food riots” will yield over 5.6 million results. That was three years ago, surely things have gotten better! They have actually gotten worse and I think they will either stay the same, or get far worse.

I gathered so much data for this article that I thought I would add my $.02 and list the source, instead of reinventing a bunch of tiny little wheels. Notice the date of the articles, most of them are very current.
 
Is There Still a Problem?

Without a doubt there is a problem with the global food supply. There are many reasons for it, ranging from drought to an emerging middle class. Instead of covering data that has been covered by better authors than I, I’ll just connect some dots.

May 6, 2011
Clinton raises alarm on rising food prices

April 21, 2011
20 Signs That Point to a Global Food Crisis

January 22, 2011
Lester Brown: Food crisis 2011 is here

January 14, 2011
Global food chain stretched to the limit
Soaring prices spark fears of social unrest in developing world

September 2, 2010
Fears grow over global food supply
 
Emerging Middle Class

There are many reasons for this title. I’ll list a few and list some links as well. First off we have an emerging middle class in India and China who are increasing the foods in their diet, often to include meat. This means more grain usage as food for the livestock.

May 4, 2011
Don’t Blame Goldman Sachs for the Food Crisis, Blame The Meat-Loving Middle Class

September 5, 2010
UN calls special meeting to address food shortages amid predictions of riots Poor harvests and demand from developing countries could push cost of weekly shop up by 10%

January 7, 2008
Forget oil, the new global crisis is food
 
Running the Aquifers Dry (world wide)

I have heard some people say the next big crisis would be fresh water. Researching this gave me a much better understanding of what they were talking about.

March 7, 2011
US farmers fear the return of the Dust Bowl

January 23, 2010
Aquifer Depletion

Water Crisis
**Look at the section called “The concept of Water Stress”
 
The Result: Food Riots

As I mentioned earlier, there were food riots in 2008. Many of you are aware that a large factor for the riots in Tunisia and Egypt was due to food prices and shortages. Thus far the food riots have been in Africa or parts of third world nations.

March 9, 2011
‘Warning Of ‘Food Price Riots In The UK’

January 30, 2011
Egypt and Tunisia usher in the new era of global food revolutions

January 7, 2011
Fresh rioting breaks out in Algerian capital Algiers
Fresh rioting has broken out in the Algerian capital and several other cities, after days of unrest over food price increases and unemployment.

November 26, 2010
Chinese pupils trash dinner hall in protest at cost of meals
 
Could We See Shortages and Inflation in America?

I think we are already seeing inflation but I think we’ll only see higher prices. Will people starve? I doubt it but we may well see shortages and people might have to give up the fast food and get back to basics.

March 24, 2011
Prices going up, but Walmart still cheapest

May 9, 2011
Food Prices Going Up As Product Sizes Shrink

February 17, 2011
The Invisible Food Crisis
Food prices are going up everywhere. Will they start rising in America, too?

November 15, 2010
Higher Corn Prices Causing Rising Grocery Prices

October 25, 2010
USDA: Food inflation to accelerate into 2011

October 8, 2010
Soaring prices threaten new food crisis

May 13, 2011 (thanks to George for the link)
Cell Phones Caused Mysterious Worldwide Bee Deaths, Study Finds
 
What can we do?

Inflation is a fact of life. Whether it sticks to the 4% that the USDA claims or it gets higher, is the only variable. What this might mean is that higher food prices very well (with some fluctuations) could be here to stay.

Now that we know what the danger is, what can we do to be prudent? We can look at food differently. By that I mean, instead of just looking at food as something that is in never ending supply and easily affordable, we can look at as an investment and as an insurance policy. Any type of investment is storing wealth for later use, 401k, stocks, bonds, CD’s and precious metals. Try to looking at your food storage the same way.

Having a stocked pantry now makes possible food shortages a mild inconvenience and not an emergency. Like I said, I don’t know that we will see shortages but I don’t plan on getting in an accident either and yet I still have insurance for it.

We can also take responsibility for making some of our own food. That may be through gardening, container gardening, aquaponics, raising livestock, hunting or any other means. To have a clear conscience I have to admit that we are not having a garden this year. We have decided to evaluate the yard and use some Permaculture principles to make the most of our space. Even if you live in an apartment and the only thing you can do is one small container garden, you will be learning the skill of growing food.

 
Please click here to vote for Prepared Christian as a top Prepper site!

If you liked this article please think about sharing it on the social media listed below, thanks!

Preparedness Club

Food Boredom and Survival Cooking

Food Boredom and Survival Cooking

In this last section I want to give some information that didn’t really fit anywhere else. I will also list some items related to food storage that you should store.


Food Boredom/Fatigue
I have read that there are people that get so tired of eating the same thing that they refuse to eat at all. This is part of the reason to have variety in your stored foods. Herbs and spices can also be used to enhance and modify recipes. As I mentioned in “Food Storage Part Three”, the storage length of herbs and spices varies, but the same food storage rules apply to them.


Water Enhancement
Storing a variety of things to enhance or flavor water is also a good idea. Dry powder mixes such as Kool-Aid or lemonade are good. Keep in mind that sugar might be needed in some of these. Gatorade mix can be used as well and is a great way to get electrolytes into the body. Tea bags or mixes are good for hot or cold teas. Hot cocoa mix and instant coffee are good as well.


Coffee
I have done minimal research into coffee storage but here is what I have found; coffee grounds by themselves can be stored for six months to a year, while whole coffee beans will store longer. Whole beans can be stored in Mylar to lengthen storage time. This will mean you will need to have a coffee grinder; having one that can grind the beans without electricity would be a good idea, in case there is loss of power. I have seen green coffee beans available but you would need to know how to roast them as well as have the implements to do so stored.


Pop, Soda, Coke, Cola, whatever you call it where you live.
Diet pop will not store for any length of time, stick to the date on the can. Regular pop will in most cases store just fine, though you should rotate this like anything else.


Power Loss/Black Out
The following are a few tips for the times you may lose power. This tip is a good idea at any time; the fuller a freezer is, the less energy it takes to keep the temperature constant. If you have unused space, you can add a 2 liter bottle of water to take up that space. This will keep the freezer cooler longer in times of power loss. You should also make a list of the entire contents of the fridge and freezer and stick it to the outside. This way people can just look at the list instead of browsing for something to eat.


Alternative Means to Cook
Have an alternative way to cook and a way to fuel it. The following are a few examples.


Open Fire
There are a few things to keep in mind about cooking over an open fire. Firewood takes 6-12 months to season. If this is going to be your fallback cooking method, you’ll want to have the wood ready well before hand and plenty of it.


Standard Barbecue
Many people have a barbecue to cook on when the weather is nice. If you go this route, have a few bags of charcoal or extra propane tanks stored safely.  Propane never goes bad and will store indefinitely.

Backpack and Camp Stoves
(click to see some examples)
These are stoves that have one or two (possibly more) burners. The ones that have one burner are often used for backpacking, as they can be very light. These stoves utilize a variety of fuel, propane and butane among the most popular.

The reason I am bringing up the next two are because they are very efficient at burning and use very little wood, they are also things you could build yourself.


Hobo Stove
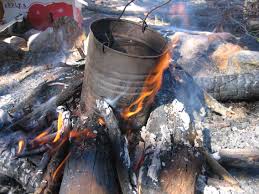
A Hobo Stove utilizes two metal containers, a larger one and a smaller one. The larger one has a large hole in the bottom for putting small pieces of wood in. There are also many holes throughout for letting oxygen in. Near the top there is a metal brace that the smaller metal can rests on. You place your food or water in the smaller can, which is heated by the flame in the larger can. The video below was found on you tube. There are many others. Just search for “hobo stove”.


Rocket Stove
A Rocket Stove can be used for heating a building or scaled down and used for cooking. Here is a link that explains the Principles of the Rocket Stove. The top video is a coffee can Rocket Stove and the bottom video is a large scale stove that could be used for heating a building. Here is an excellent article on Rocket Stoves with a better explanation then I can give as well as many more videos.


Solar Cooking
Here is a means of cooking I’m not very familiar with, that I was clued into from Jimmy a reader of the blog. It uses sunlight as a heat source, this could be a very good way to cook in an off grid situation. Wikipedia has a good write up on a Solar Cooker.


Cooking with Cast Iron and a Dutch Oven
Here are a few articles that give a wealth of information on cooking with Cast Iron and a Dutch Oven.

Cast Iron
The Irreplaceable Cast Iron Pans , Using a cast iron skillet ain’t so hard!

Dutch Oven
Seven secrets of Dutch oven cooking , Dutch Oven Cooking


Random items to stock up on that are related to Food Storage, this is not a comprehensive list, let me know what I may have missed and I will add it.

Vitamins.
Manual can opener.
Manual coffee grinder
Percolating coffee pot
Grain mill
Wine corkscrew (Don’t look at me like that, this is for Communion 🙂 )
Teapot
Paper plates, bowls, towel, napkins.
Plastic silverware
Plastic or paper cups
Aluminum foil
Saran wrap
Plastic bags of various sizes (this includes sandwich bags, garbage bags, Ziploc storage, etc.)
Fire extinguisher. (know how to use it)
Cast Iron Cook wear
Dutch Oven
Dish soap
Matches
lighters


Here are the links to the other food storage articles.

Food Storage Part One: Why Store Food And The Rules For It.
Food Storage Part Two: The Kind Of Foods That You Can Store
Food Storage Part Three: Shelf Life of Staples.
Food Storage Part Four: The Process and Enemies of Food Storage.
Food Storage Part Five: How much food should you store and where should you put it all?
Food Storage Part Six: Tips On Stocking Up and Affording it all.
Food Storage Part Seven: Food Boredom to Survival Cooking .

 
Please click here to vote for Prepared Christian as a top Prepper site!

If you liked this article please think about sharing it on the social media listed below, thanks!

Preparedness Club

Tips On Stocking Up and Affording it All

Tips On Stocking Up and Affording it all

I am not going to lie and say that food storage is cheap or easy, but it can be and should be done. You might have to make some short term sacrifices, but the long term peace of mind that comes from knowing that you can feed your family, come what may, is worth it. I’m going to try to provide some ideas to build up your pantry and a few ideas to raise some income.

Remember the short-term goals that I mentioned in “Food Storage Part Five”? Make sticking to them a priority. Don’t go into debt to stock up, but don’t put fluff ahead of it either. I plan on covering debt in another article. For now I’ll just say that getting debt free (aside from a mortgage) has not only been a tremendous blessing, it has been a huge prep in and of itself.
 

Food Storage Acquisition Tips

 
Big Box Stores and Discount Grocers

You may have a discount grocer like Aldi; this would be one way to save money. Buying bulk from a Costco, Sam’s or other big box store is another. I also know that there are some online companies that will give discounts for large ‘group buys’. If you know of other like-minded people this could be a great option.

Avoid going out and dropping hundreds at a big box store, this can really tax your finances and this is often done out of fear. If you’re not reacting out of fear and have the disposable income, this might work for you. On a side note, when you do buy from them, the items on the bottom or in back usually have a longer shelf life, as they rotate with ‘First In, First Out’ too.
 
Co-Op or Farm Direct

Another way to save money is to purchase from a co-op or directly from a farm. I listed some ways to find local co-ops and farms as well as some on-line stores at the bottom of “Food Storage Part Three” (LINK).
 
Double Buying/Copy Canning

I first heard about this process from Ron Hood ‘s video “Urban Master, Volume 1”. His wife explains that if you normally eat Spam and use a can for lunch, the next time you go to the grocery store, you purchase two. You do this for every shelf stable food that you purchase until you have the desired amount. On a side note, if wilderness survival is a topic of interest, Ron Hoods’ videos and Internet forum contain some of the best knowledge on the subject that I have been able to find.
 
Target Buying

I don’t mean the store, but a specific item. Pick one shelf stable food and purchase a specific amount each week. This number is going to vary, based on income and whatever the item is. As an example, this week I buy 12 cans of green beans, next week it’s 12 cans of corn.

Even if you are on a very tight budget, you can still add to your pantry a little at a time. I did a web search for “Food storage for $5 a week” and “Food storage on $10 a week” (without the quotes) and found the following sites. Food storage for $5 a week and Food storage on $10 a week .

Even if you can only spend $5 a week, you can take advantage of sales. The most important thing is that you are working toward your goal.


How Can You afford this all?

 
Know where your money goes.

There are two ways to do this, you can either write down what every single penny is spent on, or you can do what we did and get the bank statement and itemize it. You need to do it for at least one month, as this will make sure you get the monthly bills. We actually printed off the statements for the last year and broke things up into twenty or so categories and tallied it all up. Shocked is the best word that comes to mind. My wife does a fantastic job of keeping our budget but seeing the total that went to junk, well that brings me to the next section.
 
Needs vs. Wants

Many people are willing to spend much more on their wants then they are on their needs. Jack, at The Survival Podcast explained it something like this; gas in your car is a need, but people will complain that the price of gas went up $.05 and then drive across town to save $.02 a gallon, saving a grand total of $.40 on a twenty-gallon tank. That same person might have a craving and spend $5 on a latte. I don’t care how good it is, its still a want.

If you do as I suggested above and can see the amount of money you spend on wants, I bet you’ll be a little surprised. I’m not saying that you should deprive yourself but being honest with yourself and looking at this list, I bet you can find ways to cutback and still feel like your not being deprived.

Cut back on spending

Eat at home and bring your lunch to work. For a family of four, a fast food dinner can run up to $30, pizza or take out can be almost $50. I bring my lunch to work while most of the guys in my department eat out every day. I bet that what they spend in two days will pay for my brown bag lunch for two weeks.

Sell the excess

Glenn Beck recently cited a story that said the average family has $20,000 worth of unused stuff in their home. I’m not so sure about the $20,000 part, but I know most families have excess stuff they could sell on Craig’s list or in a garage sale or eBay. I have seen a few businesses that will sell your stuff on eBay and just take a small portion for their efforts.

Part Time Job

This might not be a great tip given our current economy; however it might be in your situation. If you get a part time job, even if you only work one shift a week and dedicate the money you earn to preps, you’ll be amazed how quickly you’ll increase your pantry.

Sell Plasma

Another option is selling plasma, I have thought about this. The last time I looked into it a person could sell plasma twice a week and receive $25 each time. That’s $200 extra a month! Blood Banker is a site that you can use to find areas local to you to sell or donate blood and plasma.


Here are the links to the other food storage articles.

Food Storage Part One: Why Store Food And The Rules For It.
Food Storage Part Two: The Kind Of Foods That You Can Store
Food Storage Part Three: Shelf Life of Staples.
Food Storage Part Four: The Process and Enemies of Food Storage.
Food Storage Part Five: How much food should you store and where should you put it all?
Food Storage Part Six: Tips On Stocking Up and Affording it all.
Food Storage Part Seven: Food Boredom to Survival Cooking .

 
Please click here to vote for Prepared Christian as a top Prepper site!

If you liked this article please think about sharing it on the social media listed below, thanks!

Preparedness Club

Store how much food and where to put it all?

Store how much food and where to put it all.

How much food you store is something that each family will need to decide. It will depend on income, storage area and other factors. I personally think people should store six months worth of food and a year if at all possible. I recommend that you have a long-term goal, whether it’s six months, a year, or even more in mind and work toward it by setting smaller goals along the way.

In the beginning, go with smaller goals; three days, then a week, then two weeks, then a month. This will do a few things. First it won’t break your bank. Second, it will keep you from fear buying. Pray along the way, asking God to guide you in how to prepare. Third, it will keep you from prepping burnout and buyers remorse.

I recommend having at least 2-3 months of the “store what you eat foods”. Once you have that, then add another 2-3 months of freeze dried or LTS (Long Term Storage) dehydrated food. From there I recommend storing staples. When it comes to staples make sure you have the storage for them as well as the equipment before you order them. This includes Mylar bags, heat sealers and oxygen absorbers.

The LDS church recommends that their members slowly work toward one year of ood stored. I do no want to get into a discussion about the LDS church; this site is about preparing the body of Christ, not deciding who is in it. Here is a Food Storage Calculator built off of the recommendations from the LDS church, it asks for the number of family members in certain age groups and will show you the amount of staples they recommend.

The idea of storing a year of food may be a little overwhelming. That is why I said to set a long-term goal and short-term goals. Once you get started and your pantry begins to grow, your long-term goal will seem much more attainable.
 

Where can you store all of this?

When it comes to food storage and keeping in mind the enemies of food storage as I mentioned in Food Storage Part 4 a cool, dry, dark place is best. With that in mind, I’ll try to give you some storage ideas that may be helpful to you. I recommend you make room for your preps before you get them home, otherwise that 50 lbs of rice might sit in the bag until you get a place ready.

When it comes to storing staples, many of them are relatively cheap and you will be more restrained by your storage space then by the cost. Whether you use a shelving system, or just stack food grade buckets on top of each other in a closet, a place to store your preps is a must.
 
Location, location, location:
Keeping a cache of food at a different location is a good idea if possible. If you have a friend or relative that is like-minded, you could each store some of the others food. I also recommend keeping some food stored in different places in your home as well. The thinking here is security and redundancy. If something happens to one section of your storage, the other could remain intact.
 
Shelf Reliance
Shelf Reliance is a company that sells a few types of preparedness related products, one of which is shelving. I purchased “The Pantry” and because of the functionality and storage space of cans that it provides, this is one of my favorite prepping purchases. They have two types, the larger Free Standing Systems and the smaller Cansolidator Series these hold a smaller amount of cans, but would be great for people that do not have a lot of room, or are on a tight budget.
 
Shelving:
There are many kinds of shelving available at the big name hardware stores. Here are a few things to keep in mind. Some of the shelves have a recommended weight limit, I have seen this mostly in the plastic shelving. Try to figure out how much space you need in-between the shelves. Also keep in mind future storage, buying or building a bigger shelf than you need right now is a good idea; “I would rather have it and not need it, than need it and not have it”.

We decided to get shelving in place before we purchased much of our preps, this was a good idea, but in hindsight I wish I had built it differently. I initially thought I would be using 5-gallon food grade buckets, and designed it to hold two five gallon buckets, one on top of the other, on the bottom shelf. When we went looking for buckets I could only find 3 and 4-gallon buckets, so there are eight inches of wasted space between the top of the highest bucket and the bottom of the shelf above it. Leaving some room so that it isn’t a really tight fit is good, but this is enough room for a 12-pack of soda or something of similar height, that is now wasted.

The other nice thing about building your own is that you can custom make it to your needs. We had a wall that was about ten feet long, so I made a 10’ long by 3’ wide shelf with 2”x4”s and 1/2 plywood. It might not be pretty, but it is very functional and holds our preps safely and securely.

For you “do-it-yourselfers” here are two plans for making your own rotating canned food systems. One plan from From wikiHow and 14 plans from CanRacks.com, $14.95 each or $110 for all 14.
 
Grocery store demo shelving.
I have seen this tip a few places and cannot remember where or I would give them credit. The displays at grocery stores are often thrown away after the display is taken down. These displays are often pretty high quality as to show the product off. Asking the store if you can have it once the display is taken down might get you some free shelving, even if you have to call the distributor.
 
Metal garbage cans:
We keep two 25 lb bags of dog food in one 30-gallon metal garbage can. I have toyed with the idea of keeping some of the preps in Mylar in one of these. It’s metal, so there is no leeching and its also rodent proof. The only real downside I can see is that it’s not incredibly portable, but for me, that’s not a big drawback.
 
Under the bed:
If you have room under your bed, you can use the shallow plastic containers, as an example Under-Bed Box with Wheels, Clear Base and add either canned goods or Mylar bags. You can tape a list of the contents to the top of the lid. This will make keeping track of the contents easier than sliding it out and pulling out each can to look for a product name.
 
Closets:
Walk in your closet, turn around and look above the door. This space is open in many closets; you can add a wire shelf there and store some lighter foodstuffs (you don’t want cans as they could roll off and land on your head).
 
Attics:
For many people the attics in their home and garage are only used for the insulation, depending on the type of insulation, you might be able to put down sections of plywood and use it for storing paper goods or other items that are not going to be affected by extreme temperatures.
 

Here are the links to the other food storage articles.

Food Storage Part One: Why Store Food And The Rules For It.
Food Storage Part Two: The Kind Of Foods That You Can Store
Food Storage Part Three: Shelf Life of Staples.
Food Storage Part Four: The Process and Enemies of Food Storage.
Food Storage Part Five: How much food should you store and where should you put it all?
Food Storage Part Six: Tips On Stocking Up and Affording it all.
Food Storage Part Seven: Food Boredom to Survival Cooking .

 
Please click here to vote for Prepared Christian as a top Prepper site!

If you liked this article please think about sharing it on the social media listed below, thanks!

Preparedness Club

The Process and Enemies of Food Storage

The Process and Enemies of Food Storage

In this section I’ll explain the enemies of food storage and how to mitigate them. I’ll also cover how to properly store food for LTS (Long Term Storage).

The five dangers of food storage are; heat, light, oxygen, moisture and pests. Minimizing the effects of these things will greatly increase the storage life of food.


Heat

Temperatures between 40 degrees and 72 degree Fahrenheit are ideal for food storage. For every 18 degrees above 72, the food loses up to half its nutritional value. If the food is exposed to temperatures over 72 degrees for an extended amount of time it can lose its color, texture and taste.


Light

Keep things in a dark space if at all possible, light can affect the appearance and taste of food. Mylar bags and food grade buckets will also help here.


Oxygen

When fats oxidize they turn rancid. Keeping your food in an oxygen free environment will prevent this, as well as kill pests that may be in the food. You can remove oxygen with oxygen absorbers in an airtight bag. I’ll cover how to know how many to use below.


Moisture

Moisture can take the form of humidity, condensation or even a water pipe breakage. To mitigate this I keep much of my preps in Mylar bags and then I put the Mylar bag in a food grade bucket. You can also add a desiccant to the inside of the Mylar for added moisture removal. I try not to have any food with cardboard packaging out in the open, as it is susceptible to accidents involving liquids, such as broken pickle jars, broken pipes or the “Not Me Ghost”, you know, children.


Pests

Pests range from larvae in bulk food to mice in your food storage area. There are a few ways to deal with each. For larvae you can stick that bag of rice, beans or whatever in your freezer for a couple of days. This will kill any bugs, larvae or eggs. I used to do that, but it’s time consuming, my freezer isn’t that big and it’s usually full. I found, on a forum, that the simple act of removing the oxygen would kill any pests in the food. This made sense and they were steps we were already doing. We have not had any problem with pests in any of the food we have stored this way. If you want to make sure, feel free to do both. I have also read that Bay Leaves will keep pests away and some people add them to the inside of the Mylar bag as well as the inside of the food grade bucket.


Mice

We keep a very clean house but the little buggers always seem to come in, especially in the fall when it starts to get cold. There are a few ways to deal with them but I prefer traps. With poison there’s a possibility they’ll make it to a spot that you can’t find before they die, which could cause a smell. Glue traps are about as inhumane as anything I can imagine. I prefer spring traps. I used to use the old fashioned ones, but they’re so touchy and can be a pain to set. I started using JAWZ Mouse Trap and I really like them. They are incredibly easy to set, still go off when “visited” and mouse extraction is quick and easy.


The “How To” of Storing Your Own Bulk Food.

This process seemed a little daunting when I began to research it. In truth it was a bit frustrating the first few times we put up some bulk food. The reason it was frustrating had to do with the process we were using. I had seen a video about using a household vacuum and a household iron to seal the bag. It worked but was an exercise in frustration. After the food and oxygen absorbers were added, the bag was heat sealed, save a section about an inch long. One end of a tube was inserted into the remaining hole, while the other end was connected to the vacuum. My wife was at the ready with the iron. I would turn the vacuum on, removing the air. I would remove the tube and my wife would seal the remaining hole. It was effective, but as said, it got frustrating. It was definitely a team building exercise!

The process we use now is much better, we purchased a heat impulse sealer,this makes things easier, but it would still work with an iron. We got rid of the vacuum completely. We achieve the airtight seal by adding more than enough oxygen absorbers for the size of the container. I’ll explain the process below.

You might be thinking why not use a vacuum sealer? The bags that come with vacuum sealers are clear. That makes the food susceptible to light. They are also not as heavy duty as Mylar and I also don’t think that they are an oxygen barrier, whereas Mylar is. So why not use Mylar bags with a vacuum sealer? We tried, the vacuum sealer wouldn’t work on Mylar. I could get the vacuum to engage but it couldn’t form a seal to remove the oxygen. I did some research on-line and found that you can make a “sleeve” out of the clear plastic bag and slide it over the Mylar. Remember me saying that the first few times were frustrating? The vacuum sealers might be fantastic for use with the bags made for them, which are frequently used in freezing, but for long-term storage I highly recommend Mylar and the process I’ll explain below.


Let me cover the needed components first;

Mylar Bags

Mylar is a clear material made from polyester resin. The balloons you see at grocery stores or party stores are made of Mylar. The Mylar bags used for food storage have a layer of foil on them. They come in varying levels of thickness. I have seen 3.5 mil – 7 mil. I have seen the recommendation to use thicker Mylar bags for things like pasta because the pasta can puncture the bag when the oxygen is absorbed and the bag tightens around it.


Oxygen Absorbers

Oxygen absorbers are made of iron oxide. When oxygen is present the iron oxide rusts as it absorbs the oxygen. When all of the oxygen has been absorbed the rusting stops. Every time I have purchased oxygen absorbers, they have come in a 50 pack, in sealed plastic packaging. I always have a canning jar on hand to put them in. I put the jar lid on as soon as I take them out of the packaging. I remove the lid as needed. This will keep the absorbers from absorbing too much oxygen. When I am done putting food up I can just leave the absorbers in the jar.

Sorbent Systems recommends that if you are filling a:

5 or 6-gallon bag, that you use 1500cc-2000cc oxygen absorber.
3-gallon bag should use 1000cc
1-gallon bag or #10 can should have 300cc.

You can mix sizes to get to the recommended amount of absorption. Use 1 1000cc or 4 300cc. It’s a bit of overkill but it’s better to go a little overboard than to not have enough.

Keep in mind that since we’re not using a vacuum, the package will not be “solid” right away. Once the oxygen absorbers have had some time to work the effect is as good as using a vacuum and a lot less frustrating.


Heat Source

As I mentioned, we now use an impulse sealer, but you can do this with an iron as we have in the past.


Food Grade Buckets

Here is an article that explains what food grade plastic is. Most food grade buckets have a “2” in the recycle symbol. You can purchase brand new food grade buckets on-line. The prices often range from $7-$10 (depending on size) with the lid included. However, you can often get them locally cheaper or even completely free.

I purchased the bulk of mine from a bakery for $2.00 (including the lid). I also got some free from the bakeries in the local grocery store, Sam’s and Costco. I had to endure a few odd looks but for the $10 I saved, I’ll deal with it. We washed these buckets thoroughly with hot water and dish soap.

Keep in mind that there is a chance that whatever was in the bucket may leave it’s scent on whatever you put in the bucket. If you get a bucket that smells like pickles, there isn’t much you’re going to be able to do to get the smell out. You may be able to purchase something to wash it with, but once you factor in the cost of that product and the time, you would probably save money by buying a new bucket.
 

Do you have to use food grade buckets, or will any 5 gallon bucket suffice?

If you’re storing the food in Mylar than the food will only come in contact with the Mylar bag, which is food grade.  If you’re going to have the food loose in the bucket then yes, you should use a food grade bucket.


Gamma Seal Lids

As you’ll soon discover, taking the lids off of these buckets can take a toll on your fingernails and knuckles. Gamma seal lids go on like a normal lid but they also have an inner lid that screws off, leaving the outer sections attached to the bucket.

I didn’t go the gamma seal route. Instead, I have a Bucket Wrench. I didn’t use one at first but after I had a few fingernails bent back I ordered one.

Another possible storage option:

Something that I learned about from Jack on The Survival Podcast is Paint Style Cans w/ Gold Phenolic Lining; these are FDA approved and are evidently great for storage. You can put the food right in the can, add an oxygen absorber and put the lid on.


The process of storing food in Mylar:

Step One: Get all of the needed items in one place:
-Item to be stored.
-Mylar bags.
-Oxygen absorbers.
-Heat Sealer.
-Permanent Marker or labels and pen.
-Scoop (in this case it was a large plastic cup.)
-Food Grade bucket.

Step Two: Add an oxygen absorber and start adding food to the Mylar bag. I usually add an oxygen absorber at the bottom of the bag, the middle and near the top. Remember that the amount of oxygen absorbers you’ll need to add are dependent on the size of the bag you are using.

Notice the headroom left at the top, you’ll need to leave room so when you lay it flat, the contents don’t spill.

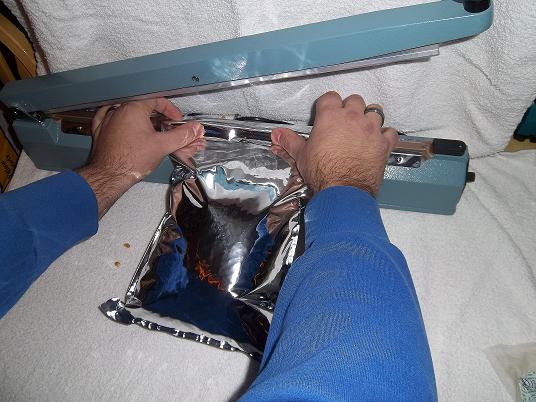
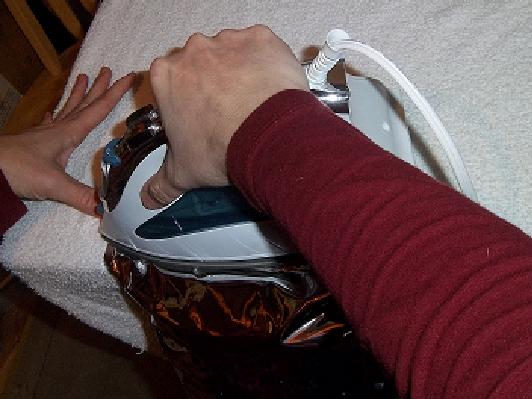
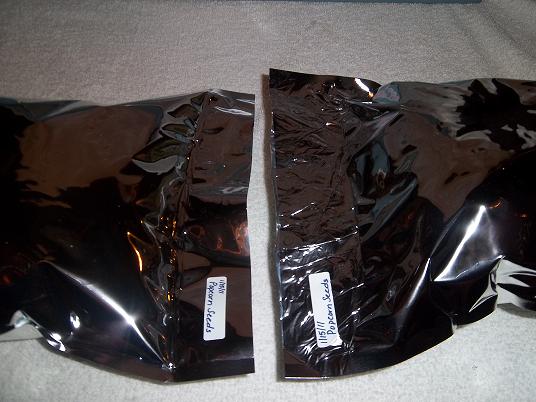
Step Three: Seal the bag. The left picture is of an impulse seal. The right is of a household iron seal. The picture below them is a side-by-side comparison of the two. Leaving the iron on the bag for more then a second or two can cause the bag to melt on the seal line, leaving a hole.

Step Four: Label the Mylar bag with content and date stored. Writing on the bag is fine; the labels are just easier to read.

Step Five: Put the filled Mylar bag in the bucket. I usually leave the lid off so that I can check to make sure the oxygen has been removed from every bag. We will occasionally get one that has to be repacked with a new bag and oxygen absorbers.

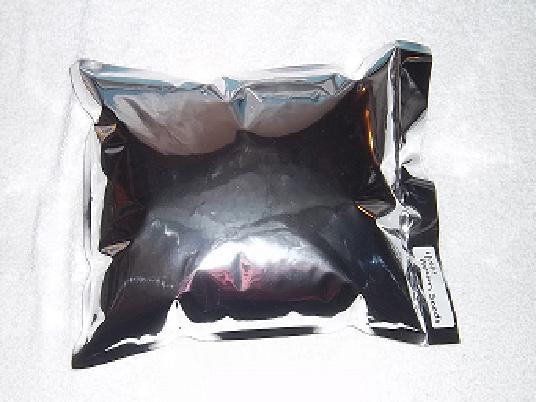
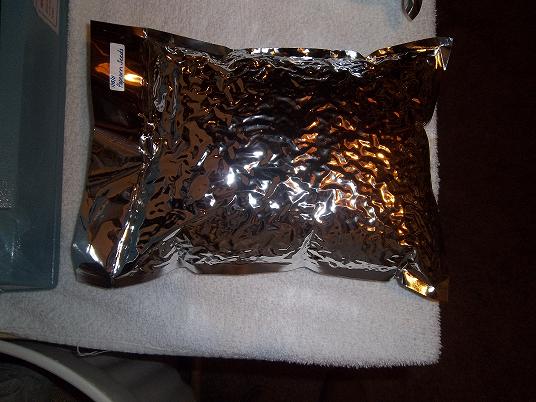
Here are before and after pictures, the left (or top, depending on your monitor resolution) one is right after sealing, before the oxygen absorbers have done their work. The right one is 12 or so hours later, notice how the bag is dimpled, that is the easiest indication that the oxygen is removed.

Once you’re sure the oxygen has been removed from all bags, you can put the lid on. I can get three, one gallon bags in the 3-4 gallon buckets.

One of the mistakes we made in the beginning was using Mylar bags that were large enough to fill the entire bucket. The problem with this is that once you open the large bag, all of the contents then have to be used, or you have to reseal them. We now use smaller one-gallon bags and put three in the bucket.

Here are some resources for purchasing food storage supplies. Interteck Packaging and Sorbent Systems carry mainly Mylar, oxygen absorbers and the like, while Emergency Essentials carries a wide variety of preparedness supplies.

2-14-11 Update
I am in need of more oxygen absorbers so; I went to the three sites I have listed and, well lets just say I found a much cheaper source. Honeyville Grain at the bottom of the page. Nearly half of one of the sites listed. I’m going to leave the others, as they are a good source for other things.


Here are the links to the other food storage articles.

Food Storage Part One: Why Store Food And The Rules For It.
Food Storage Part Two: The Kind Of Foods That You Can Store
Food Storage Part Three: Shelf Life of Staples.
Food Storage Part Four: The Process and Enemies of Food Storage.
Food Storage Part Five: How much food should you store and where should you put it all?
Food Storage Part Six: Tips On Stocking Up and Affording it all.
Food Storage Part Seven: Food Boredom to Survival Cooking .

 
Please click here to vote for Prepared Christian as a top Prepper site!

If you liked this article please think about sharing it on the social media listed below, thanks!

Preparedness Club

Shelf Life of Staples

Shelf Life of Staples

What are food staples?

Wikipedia has a pretty good explanation of what staple foods are. In short it says a staple is a food that is “eaten regularly and in such quantities as to constitute the dominant part of the diet and supply a major proportion of energy and nutrient needs.”

What are some staples that can be stored long term? – Note, in many of these explanations I say, “When stored correctly”, I’ll cover this in greater detail in the next article. For now just know that in general this means dry, cool, dark, oxygen free and secure from pests.

This is not an exhaustive list of staples. If you notice one that is missing and feel it should be added, please let me know. A quick disclaimer; the information here has been gathered over many resources and should be viewed as “best practices”. I have not stored any of these items for 30 years to see if they’re still edible.
 

Grains

Grains store very well because the hard outer shell is protecting the inner seed. When stored correctly, they have a shelf life of 30+ years. One of the most popular types of grains to store is wheat. Different types of wheat are better for different things. Wikipedia has a good description and explanation of different kinds of wheat. In the section “Major Cultivated Species of Wheat”

-Note; if you store grains, you will need a mill to grind them.

Some examples of hard grains are: Buckwheat, Kamut, Millet, Durum wheat, hard red wheat, hard white wheat and Spelt.

Some examples of soft grains are: Barley, Oats, Quinoa and Rye.
 

Flour

After the shell is broken and can no longer protect the seed, the nutrients begin to degrade. Wheat is then ground into flour. Don’t try to store flour for more than a year. I have read that flour stored correctly can be stored for five years.

Types of flour: All Purpose Flour, Bakers Flour, Unbleached Flour, White
Flour, Whole Wheat Flour, Cornmeal.
 

Rice

Brown rice has the shell containing fatty acids attached. These acids go rancid after six months or so.

White rice has had the outer shell removed. Because of this, it has less nutrients but will store much longer; as long as 30 years if stored correctly.

Rice that has a very long storage life: White, Wild, Jasmine, Arborio and Basmati.
 

Beans

The magical fruit if stored correctly can have a shelf life of 30+ years. Aged toots.

Some types of beans: Kidney, Garbanzo, Great Northern, Lentils, Lima, Pinto and Soy.
 

Beans and Rice

I have heard that beans and rice are a complete protein, I’ve also heard they are not. So I did my own research and the following is what I found. A complete protein contains all essential amino acids. Animal based protein such as meat, milk, eggs are good sources of complete proteins, whereas most plant based proteins are not. A combination of grains, legumes or vegetables can be made to create a complete protein; one of which is beans and rice.

The reason that beans and rice are a popular choice for preppers is that you can put up a large amount fairly inexpensively. I caution you against making this the bulk of your stored food. As I mention in part two, diversity is important. One of the reasons it is important is food boredom. Beans and rice every day would wear thin quickly but they could be mixed in now and then to stretch your other food supply. A side note; unless beans are a part of your normal diet, they can do a number on your digestive system. I have read that over time your body will adjust and the gas will lesson. You can also mitigate this and other digestive problems with other preps. I’ll cover those at another time.

Here are some of the articles that explain how beans and rice make a complete protein.

Laissez “Fare” Nutrition: Protein

Incomplete vs. Complete Proteins

What’s a Complete Protein? Inquiring Vegetarians Want to Know.
 

Pasta

Pasta will store longer then flour but probably not as long as un-cracked wheat. I got a really good tip from a friend that I haven’t tried yet; you can cook pasta and then dehydrate it. The benefit of this is that it is already cooked and can be reconstituted and eaten.
 

Dehydrated Dairy Products

If a dehydrated product has fat in it, the shelf life is probably about 5 years. If it is fat free then the shelf life is 20 years. Some of these things don’t taste very good on their own, but if used for baking taste just fine.

Types of Dehydrated Dairy Products: Dehydrated Milk, cheese powder, cocoa powder, powdered eggs, butter or margarine powder.
 

Honey

There are three types of honey. Pure honey won’t go bad. It can crystallize but it turns back into liquid if warmed. (Avoid boiling, as that will kill nutrients.) The other two types are adulterated and artificial. Adulterated honey is real honey with another ingredient added. Artificial honey is, well, artificial. The honey found as condiments at restaurants is most often adulterated or artificial. Here is an article that explains How to Distinguish Natural Honey and Artificial Honey.
 

Salt and Sugar

If salt and sugar are kept dry they should store for a very, very long time. Sugar has a tendency to harden. It can be broken back into granules. These are two items I recommend storing a fair amount of. They are used in a lot of things and chances are you can’t reproduce them. Most of the uses for sugar are related to food but here are Sixty Uses For Table Salt

Keep in mind there are many kinds of salt. Here is an article called Beyond Table Salt — A Guide To Different Types Of Salt.
 

Yeast

Yeast, if kept in its foil container, should have a storage life of at least one year.
 

Cornmeal

As I mention in the section on flour, cornmeal has a pretty limited shelf life. However, you can make cornmeal out of popcorn seeds and popcorn seeds have a much longer shelf life. You’ll need a grinder for this as well.
 

Baking Soda

Also known as sodium bicarbonate, baking soda is another one of the staples that has many uses. It acts to neutralize acids and break down proteins. This makes it useful as a tenderizer and a leaven. It has a neutralizing effect on acidic scent that makes it an effective deodorizer. Added to the water when doing laundry, it stabilizes the pH level, enhancing the detergent’s effectiveness. If kept in the cardboard box the storage life is probably around a year. If kept oxygen free and moisture free it should store indefinitely.
 

Herbs And Spices

The shelf life of spices and herbs varies greatly so I’ll just give some general rules. Whole spices have a longer shelf life and often have a better taste and smell when freshly ground. Herbs lose their flavor faster then spices. If they have little to no smell when crumpled in the palm of your hand they should be replaced. The same rules apply for storage of spices, which means that keeping them above the oven, as is very common, probably isn’t the best place to store them. We have some individual spices, but also stock some of the mixes. Herbs and spices are one way to combat food boredom.

Here is an article from the Mother Earth Network called Forever foods: 10 cooking staples that can outlast you.
 

Cooking With Staples

For those of us that don’t have a lot of experience cooking with staples, here are a few resources.

The Food Network offers 100 Wheat Recipes.

Chef Keith Snow created a website called Harvest Eating. On it, he shows people how to cook with locally grown foods, with techniques people of any skill level can use. I have heard him interviewed on a couple of different Podcasts and was impressed with his approach. I think his site is a fantastic idea.

Here are two books that I own;

The Amazing Wheat Book

Making the most of basics
I can’t recommend this book enough. It not only has information on cooking with staples, but a wealth of information on basic skills that not many in our culture retain.

Lastly I want to give you a few sources for finding staples, both on-line and locally.

Here are some links to help you find sources locally to you that you can
purchase staples in bulk.

Local Harvest
Coop Directory
Sustainable Table
FoodRoutes.org
Eat Well Guide

Here are some links to help you find sources on-line that you can purchase staples in bulk. I would recommend checking a few of them before placing an order. Prices and shipping prices will vary.

Wholesale Bulk Foods.com
Pleasant Hill Grain

WHEAT MONTANA FARMS & BAKERY
Honeyville Grain
Organic Wheat Products
Barry Farm Foods
Bob’s Red Mill
King Arthur Flour Company
War Eagle Mill
USA Emergency Supply
Dutch Valley Food


Here are the links to the other food storage articles.

Food Storage Part One: Why Store Food And The Rules For It.
Food Storage Part Two: The Kind Of Foods That You Can Store
Food Storage Part Three: Shelf Life of Staples.
Food Storage Part Four: The Process and Enemies of Food Storage.
Food Storage Part Five: How much food should you store and where should you put it all?
Food Storage Part Six: Tips On Stocking Up and Affording it all.
Food Storage Part Seven: Food Boredom to Survival Cooking .

 
Please click here to vote for Prepared Christian as a top Prepper site!

If you liked this article please think about sharing it on the social media listed below, thanks!
Preparedness Club